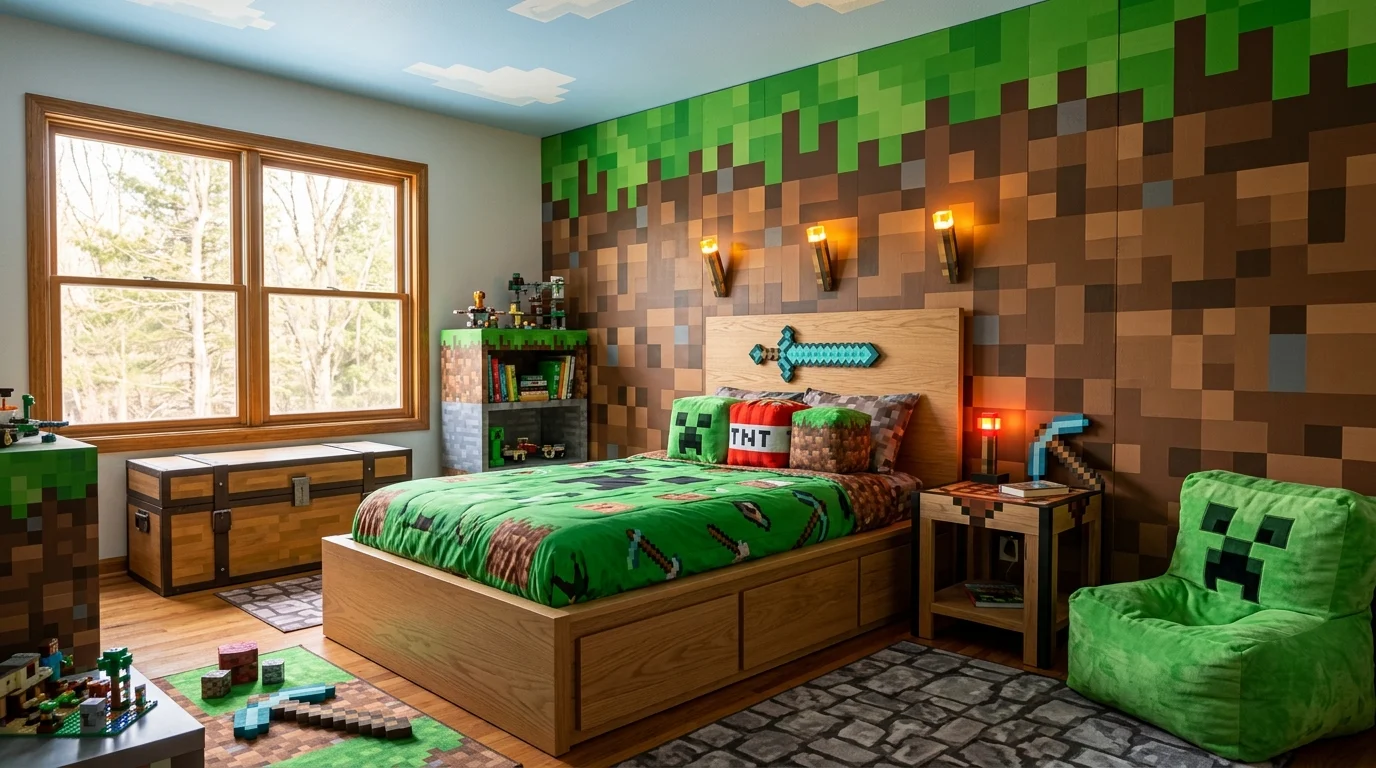
When my nephew turned eight, all he talked about for months was Minecraft, the game, the characters, the blocky aesthetic, everything. His birthday request wasn’t for a new toy or a party theme, it was simple and direct: he wanted his bedroom to “look like Minecraft.” I remember laughing a little at first, assuming this would be a quick weekend project involving maybe a poster and a green bedspread. It turned into a genuine multi-weekend renovation that taught me far more about pixelated, blocky design than I ever expected to learn.
What surprised me most was how much genuine creativity this specific aesthetic allows for. Minecraft’s visual language, cubic shapes, saturated but limited color palettes, textured “block” patterns, translates surprisingly well into real-world room design once you understand the core visual rules the game itself follows. I made a few missteps along the way, some early attempts looked more like a random green room than anything recognizably Minecraft, before I figured out what specific details actually made the space read clearly as the game world he loved.
Since finishing his room, I’ve helped a couple of other family members tackle similar Minecraft-themed spaces for their own kids, which gave me a broader, more practical sense of what genuinely works. Here are 17 Minecraft-themed bedroom ideas, based on real builds and real kid feedback, all aimed at creating a space any young Minecraft fan will genuinely love.
1. Paint a Pixelated Grass-Block Accent Wall
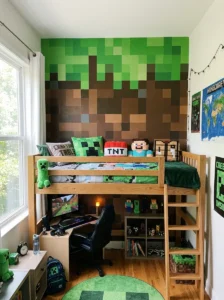
The single biggest transformation in my nephew’s room came from a hand-painted pixelated accent wall, designed to mimic the game’s iconic grass-block texture, green on top with a brown, dirt-textured lower section, all rendered in the game’s signature blocky, low-resolution style rather than a smooth, realistic gradient.
I used painter’s tape to map out a grid across the wall first, roughly six-inch squares, which let me create that authentic blocky, pixelated look rather than a smooth painted transition between colors. This grid method took considerably longer than a simple two-color wall would have, but the resulting texture immediately read as unmistakably “Minecraft” the moment it was finished, which made it worth the extra weekend of taping and painting.
I’d recommend, for anyone attempting this themselves, sketching out your specific pixel pattern on paper first, using actual in-game grass block textures as reference, before starting the taping process on the actual wall. This planning step saved me from a couple of taping mistakes during my second attempt at a similar wall in a friend’s son’s room, where skipping this step led to some uneven, oddly proportioned pixel blocks that needed correcting partway through.
For anyone hesitant to commit to hand-painting an entire wall, several home decor retailers now sell pre-made pixelated wall decals specifically designed to mimic this exact grass-block aesthetic, providing a similar visual effect without requiring the painting skill or time investment a fully hand-painted version demands. Either approach transforms a plain wall into the single strongest visual anchor for the whole room’s theme.
2. Build a Crafting Table Nightstand
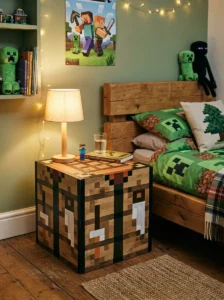
One of my nephew’s favorite additions ended up being the least expensive, a nightstand built from a plain wood cube storage cabinet, painted brown with black grid lines added using painter’s tape and black paint, designed to mimic the game’s iconic crafting table texture exactly.
I researched the specific crafting table texture pattern from the game itself before painting, making sure the grid proportions and specific tool icon placements matched closely enough to be immediately recognizable to any Minecraft-familiar kid, rather than just a generic brown box with random lines. This attention to matching the actual in-game texture as closely as possible made a genuine difference in how excited my nephew was about this particular piece compared to some other, less carefully researched attempts elsewhere in the room.
For anyone without existing furniture to repurpose this way, even a simple, inexpensive unfinished wood cube storage cabinet from a craft or furniture store provides an ideal blank canvas for this kind of project, since the basic cube shape already closely matches the crafting table’s actual proportions in the game.
I’d recommend sealing the finished paint job with a clear matte polyurethane coat, since a nightstand naturally receives a lot of daily handling, and the painted design held up considerably better against that regular use once properly sealed compared to an unsealed test piece I’d painted initially without this protective step. This small, budget-friendly project ended up being one of the most talked-about pieces among his friends.
3. Create a Creeper-Themed Reading Corner
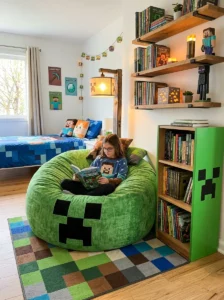
My nephew’s reading corner became one of the room’s standout features, anchored by a large plush creeper-shaped floor cushion alongside a smaller bookshelf painted in the character’s signature green and black pixelated face pattern, mimicking the game’s most recognizable hostile mob.
I found the plush creeper cushion through a licensed Minecraft merchandise retailer, though a friend attempting a similar corner in her own son’s room instead sewed a simplified version herself using green fleece fabric and black felt cutouts for the character’s distinctive face pattern, a more budget-friendly alternative for anyone with basic sewing skills.
The bookshelf itself required careful planning to get the pixelated face proportions right, since an inaccurate or oddly proportioned rendering of this specific, highly recognizable character face would have been immediately obvious to my nephew, who knows the game’s visual details intimately. I again used the grid-taping method from the accent wall project, working from an actual in-game reference image to ensure the black facial pattern’s specific proportions and placement were accurate.
This reading corner has become one of the most consistently used spots in the whole room, which taught me an important lesson about this kind of themed design project overall, focusing your most detailed, accurate execution on the specific characters or elements a child is most personally attached to yields better long-term engagement than spreading equal effort evenly across every possible theme element throughout the room.
4. Install LED Strip Lighting for a “Torch” Glow
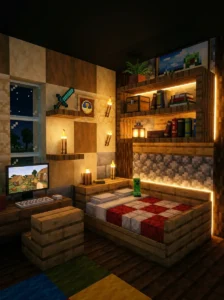
Torches are such a central, functional element within the actual game, providing light and marking safe areas within the Minecraft world, that recreating a similar warm, glowing light source throughout my nephew’s room added genuine thematic authenticity beyond just the visual color and pattern elements covered elsewhere on this list.
I installed simple warm-toned LED strip lighting along the room’s baseboards and behind a few strategically placed wood block shelving pieces, creating small pools of warm light reminiscent of the torch placement patterns players often use within the actual game to light their in-game builds and prevent hostile mobs from spawning nearby.
For an even more literal interpretation, some families construct small, torch-shaped wall sconces using a simple wood dowel base topped with an orange-toned LED light source, mimicking the actual visual shape of the game’s torch item rather than just replicating its warm light quality through more generic strip lighting.
This lighting layer proved particularly meaningful to my nephew specifically because it connected to actual gameplay knowledge and strategy, rather than being purely decorative, he genuinely understood and appreciated the reference to torch placement as a real, functional gameplay mechanic, which added a layer of engagement beyond what purely visual theming elements alone provided.
5. Build a Block-Style Bookshelf Using Cube Storage
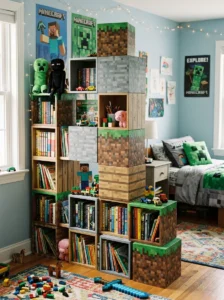
Rather than a traditional bookshelf, I used modular cube storage units, arranged and painted to look like individual stacked “blocks,” some in brown wood-plank textures, others in gray stone-brick patterns, mimicking the varied block types players collect and use throughout the actual game.
This modular approach also provided genuine practical flexibility, since the individual cube units could be rearranged into different configurations as my nephew’s storage needs changed over time, rather than committing to a single, fixed bookshelf shape and size from the outset. I painted each cube’s specific texture using the same grid-taping method described in earlier ideas, researching actual in-game block textures for oak planks, cobblestone, and a couple of other commonly recognized block types to ensure accuracy.
I’d recommend, for anyone attempting this project, choosing three or four specific, highly recognizable block types rather than trying to replicate every single block variety available within the actual game, which would require an impractical number of individually painted cube units. Focusing on the most iconic, easily recognizable blocks, grass, stone, wood planks, provides strong thematic impact without requiring the exhaustive effort of representing every possible in-game block variation.
This project took the most total painting time of any single element in the whole room, given the number of individual cube faces requiring careful texture work, but it also became one of my nephew’s favorite functional pieces, genuinely useful for storage while constantly reinforcing the room’s overall theme.
6. Add a Pixelated Area Rug
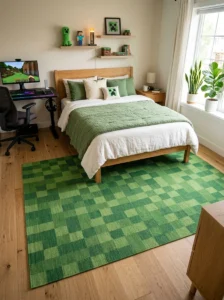
Finding, or creating, a rug with a genuinely pixelated, blocky pattern proved trickier than most other elements in this project, since standard area rugs rarely feature this specific kind of low-resolution, grid-based pattern typical of Minecraft’s visual style. I eventually found a licensed Minecraft-branded rug through an online retailer, featuring a grass-block pattern that matched the accent wall’s aesthetic closely.
For families unable to find or afford a licensed option, a friend achieved a similar effect using a plain, solid green rug as a base, then adding cut squares of brown felt fabric arranged in a grid pattern across one section to mimic a dirt-and-grass block transition, essentially creating her own simplified, DIY version of the pixelated pattern using basic craft materials and fabric glue.
This rug became an important grounding element for the whole room’s theme, since floor-level texture and pattern often gets overlooked in themed room projects that focus primarily on walls and furniture, leaving the floor as a missed opportunity for reinforcing the overall aesthetic.
I’d recommend, when selecting or creating a themed rug for a kid’s room specifically, prioritizing genuine durability alongside the visual pattern, since floor coverings in an actively used kid’s bedroom face considerably more wear than wall or shelf-based decorative elements, and a beautifully patterned but flimsy rug will show wear and need replacement considerably sooner than a well-constructed one.
7. Create a Blocky Cloud Ceiling Design
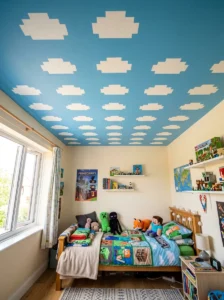
For the ceiling, rather than leaving it plain white, I added a simple sky-blue paint with a few white, blocky “pixelated” cloud shapes scattered across it, mimicking the game’s distinctive, simplified cloud rendering style rather than realistic, soft-edged clouds.
This ceiling treatment required a bit more painting precision than I initially expected, since achieving that specific blocky, geometric cloud shape, rather than accidentally painting something that just looked like a soft, rounded cloud, took a few attempts with painter’s tape to get the proportions and edges appropriately sharp and geometric rather than organic and rounded.
My nephew specifically pointed out this ceiling detail to friends during a sleepover shortly after the room’s completion, which suggested to me that even less immediately obvious elements like ceiling treatments genuinely register with kids deeply familiar with a specific game’s visual details, rather than going unnoticed the way a similar detail might in a less theme-specific room redo.
For anyone hesitant to paint an entire ceiling, even a smaller section, directly above the bed specifically, treated with this same blocky cloud pattern can provide a similar thematic touch without requiring the more significant time investment of painting an entire ceiling’s surface. This detail also softens the transition between the more saturated wall colors and a plain, unthemed ceiling that would otherwise feel oddly disconnected from the rest of the room.
8. Build a Diamond Sword Wall Display
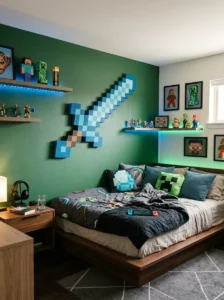
A genuinely striking focal point in my nephew’s room turned out to be a wall-mounted, foam-constructed replica of the game’s iconic diamond sword, painted in the light blue and gray tones matching the in-game weapon’s distinctive appearance, mounted at an angle above his desk area.
I built this using dense foam board, cut into the sword’s specific silhouette using a reference image from the actual game, then carefully painted with the characteristic pixelated blade pattern using the same grid-taping technique applied throughout several other elements in the room. Getting the specific silhouette proportions right took a couple of attempts, since even a slightly incorrect blade-to-handle ratio made the finished piece look noticeably “off” to my nephew’s genuinely expert eye for the game’s specific visual details.
For anyone without the woodworking or foam-crafting skills to build this kind of prop from scratch, several online retailers and Etsy sellers specifically offer pre-made Minecraft weapon replicas designed for exactly this kind of wall display purpose, providing a similar visual impact without requiring the crafting skill and time investment a fully DIY version demands.
This became genuinely one of the room’s standout conversation pieces among my nephew’s friends, reinforcing a lesson I’ve noticed across several of these themed room projects, a single, well-executed statement piece often generates more genuine excitement than spreading the same effort across many smaller, less impactful decorative touches throughout the room.
9. Use Green and Brown as Primary Wall Colors
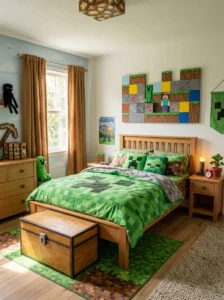
Beyond the specific pixelated accent wall mentioned earlier, I chose green and brown as the room’s primary supporting color palette throughout, appearing in bedding, curtains, and smaller decorative accents, directly reflecting the game’s dominant grass-and-dirt color scheme that defines much of its overworld visual identity.
I was careful to choose a slightly muted, less neon-bright green than my first instinct suggested, since a very saturated, artificial-looking green risked feeling more like a generic “grass” theme rather than the specific, recognizable tone associated with the actual game’s visual palette. Testing paint swatches directly against reference images from the game itself helped me calibrate this color choice more accurately than working from general color intuition alone.
This consistent, restrained color palette, rather than incorporating every possible color from the game’s much broader overall visual range, kept the room feeling cohesive and genuinely tied to the specific Minecraft aesthetic rather than becoming a scattered, rainbow-colored space that referenced the game only loosely through scattered logos and characters without a unified underlying color story.
For anyone planning a similar room, I’d recommend choosing this kind of restrained, two or three color foundational palette early in the planning process, then layering more specific character or item references on top of that consistent base, rather than trying to incorporate every visually distinct element from the game’s much broader universe all at once.
10. Add a Chest-Inspired Toy Storage Box
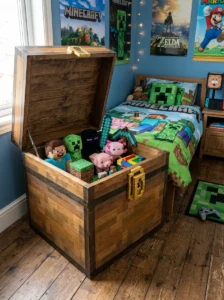
One of the most functionally useful additions to the room was a large wooden storage chest, painted to mimic the game’s iconic treasure chest item, complete with the characteristic brown wood-plank texture and gold-toned metal corner and clasp details, used for storing toys and games that didn’t need to stay visibly displayed.
I found an unfinished wood storage chest at a craft store, which provided an ideal blank canvas already shaped appropriately for this specific transformation, requiring just the painted texture work rather than any structural building or modification. The gold clasp and corner details were achieved using metallic gold paint applied carefully with a small brush, adding just enough dimensional detail to read clearly as the game’s specific chest design rather than a generic brown storage box.
This became one of my nephew’s most frequently used pieces of furniture in a purely practical sense, beyond its thematic value, since having a designated, thematically appropriate spot for miscellaneous toy storage genuinely helped with keeping the rest of the room organized and tidy, an unexpected practical benefit beyond the project’s primarily decorative goals.
For anyone building a similar piece, I’d recommend adding a soft-close hinge mechanism if the original chest didn’t include one, since kids enthusiastically opening and closing storage chests repeatedly throughout regular use can put genuine wear on standard hinges not designed for that kind of frequent, sometimes forceful interaction.
11. Create Pixel Art Portraits Using Perler Beads
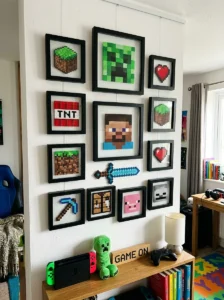
For smaller, more detailed decorative elements, I worked with my nephew directly to create several small pixel art portraits using perler beads, small plastic beads melted together with an iron to form permanent, blocky images, depicting a few of his favorite in-game characters and items.
This project became genuinely collaborative rather than something I did entirely on my own for the room, my nephew picked out which specific characters and items he wanted represented and helped place the beads himself under supervision during the melting process, adding a meaningful layer of personal involvement and pride in these particular decorative pieces compared to elements I’d designed and built entirely independently.
We framed the finished perler bead pieces in simple black frames and arranged them in a small gallery grouping on one wall, creating a genuinely personal, handmade focal point that felt distinctly different from the more elaborate, adult-executed projects elsewhere in the room, adding a valuable layer of authentic, kid-created character to the overall space.
This is one of the more affordable and accessible projects on this entire list, requiring just perler beads, pegboards, and a basic household iron, and I’d genuinely recommend it specifically as a collaborative activity with the child whose room you’re decorating, rather than a project executed entirely without their direct involvement, given how much genuine engagement and pride this particular element generated compared to some other room features.
12. Build a Blocky Wood Headboard
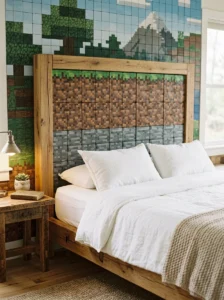
Rather than a standard, smooth headboard, I built a simple wood headboard using stacked, painted wood blocks arranged to mimic a section of the game’s terrain, combining stone, dirt, and grass block textures across the headboard’s surface in a layout resembling a small cross-section of an in-game landscape.
This required more genuine woodworking than several other projects on this list, cutting and assembling actual wood blocks into a stable, wall-mountable structure, rather than simply painting an existing flat surface. I used basic pine lumber, cut into uniform cube shapes, then assembled and secured them onto a plywood backing board before applying the individual block textures using the grid-taping painting method described throughout several earlier ideas.
The dimensional, actually three-dimensional block texture, rather than a flat, painted representation of blocks, added a genuinely tactile quality that several of the flatter, purely painted elements elsewhere in the room didn’t quite replicate, my nephew specifically enjoys running his hands along the raised block edges, which added a sensory dimension beyond the purely visual theming most other elements in the room provided.
For anyone without woodworking experience or tools, a simpler alternative involves purchasing a plain, flat headboard and applying a large, single pixelated landscape decal or wallpaper panel designed to mimic this same block-terrain visual effect without requiring the more involved three-dimensional construction process.
13. Add Glow-in-the-Dark Ore Decals
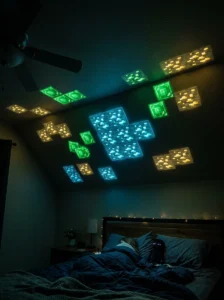
Beyond the LED torch lighting mentioned earlier, I added a scattering of glow-in-the-dark decals shaped like the game’s various valuable ore blocks, diamond, gold, and emerald specifically, positioned across the ceiling in a pattern loosely mimicking how these resources might appear scattered within an in-game cave system.
This addition specifically plays into a genuinely exciting gameplay experience for many Minecraft players, discovering valuable ore deposits while exploring underground, which made this particular decorative choice resonate strongly with my nephew’s own actual gameplay experiences and preferences within the game itself, beyond simply referencing the game’s general visual aesthetic.
I chose decals rather than attempting to hand-paint this specific detail, since the precise, small-scale pixelated patterns required for these particular ore block textures would have been considerably more difficult to execute accurately by hand compared to some of the larger-scale painting projects elsewhere in the room, and pre-made decals provided better accuracy for these smaller, more visually complex details.
This nighttime element has become a genuine part of my nephew’s bedtime routine, he enjoys turning off the main lights and looking up at the glowing ore pattern before falling asleep, adding a functional, calming bedtime ritual beyond the purely decorative daytime appearance these decals also provide.
14. Create a Nether Portal Doorway Frame
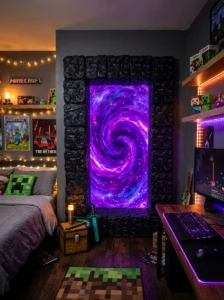
For a particularly ambitious addition, I built a simple wood frame around my nephew’s closet doorway, painted with the distinctive purple and black obsidian-block pattern that surrounds the game’s iconic nether portal structure, transforming a mundane closet entrance into a thematically significant focal point.
This project involved constructing a simple wood frame from stained black lumber, mimicking the game’s obsidian block texture, then adding a purple-toned fabric or painted panel within the doorway opening itself to reference the portal’s distinctive swirling purple visual effect when active within the actual game.
Getting the specific proportions of this frame right relative to the actual doorway required some careful measuring and planning before construction began, since an improperly sized frame would have either looked disproportionately small relative to the doorway or would have required more substantial structural modification than I’d originally planned for this particular project.
This became genuinely one of the most talked-about features among my nephew’s friends during subsequent visits, largely because it transformed a mundane, easily overlooked architectural element, a standard closet door, into something thematically significant and visually striking, which taught me that looking for these kinds of overlooked architectural opportunities, doorways, closet fronts, can yield particularly high-impact thematic transformations relative to the effort required.
15. Build a Pickaxe-Shaped Coat Hook
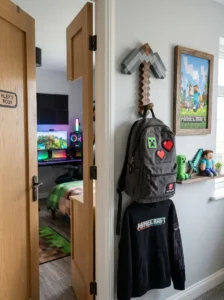
A small, functional detail that added genuine daily-use thematic reinforcement was a simple wall-mounted coat hook, carved and painted to resemble the handle and head of the game’s iconic pickaxe tool, used for hanging backpacks, jackets, and other daily items near the bedroom door.
I modified a plain wood coat hook by adding a painted pickaxe head shape to its base using craft foam cut into the appropriate silhouette, then securing it with strong adhesive before painting the whole assembly in the tool’s characteristic gray stone or iron coloring, depending on which specific tool tier from the game we were referencing for this particular piece.
This kind of small, genuinely functional daily-use item, rather than a purely decorative display piece, ended up integrating naturally into my nephew’s actual daily routine, hanging his backpack there each afternoon after school, which reinforced the room’s overall theme through consistent daily interaction rather than existing only as something occasionally noticed during more passive moments spent in the room.
I’d recommend, for anyone planning a similarly themed room, specifically looking for these kinds of small, functional daily-use items, hooks, organizers, small storage containers, as opportunities for thematic reinforcement, since these items receive far more consistent daily attention and use than purely decorative wall art or larger furniture pieces that a child might eventually stop consciously noticing after the room’s initial novelty period passes.
16. Add a Zombie or Skeleton Silhouette Wall Decal
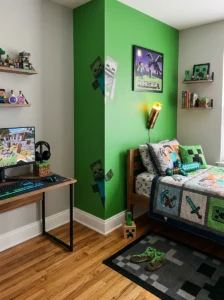
For a slightly more subtle nod to the game’s hostile mob characters, rather than the more prominent creeper elements covered earlier, I added simple black silhouette decals of zombie and skeleton characters near the room’s baseboards, positioned as though these characters were “approaching” from along the floor level, referencing their nighttime spawning behavior within the actual game.
This smaller, more subtle detail provided some additional thematic depth without requiring the same significant investment of time and materials that some of the larger, more prominent features elsewhere in the room demanded, and it specifically appealed to my nephew’s appreciation for the game’s survival and combat elements, distinct from the building and crafting references covered through other room elements.
I positioned these decals carefully, at a height and placement that suggested these characters emerging from beneath the bed or from behind furniture, adding a small element of playful, age-appropriate spookiness that my nephew specifically requested and clearly enjoyed, rather than placing them randomly without this more intentional, narrative-suggestive positioning.
This is a good example of how smaller, lower-cost decorative elements, simple vinyl decals in this specific case, can still contribute meaningfully to a room’s overall thematic depth and personal resonance when placed thoughtfully, rather than assuming only larger, more expensive or time-intensive projects can provide genuine value within a themed room design like this one.
17. Involve Your Child Throughout the Entire Design Process
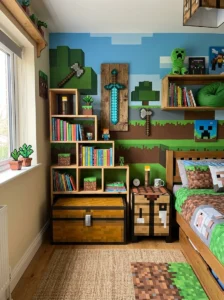
The final and most important lesson from building my nephew’s room, echoing similar lessons I’ve learned from other themed kids’ room projects since, is that involving him directly throughout the planning and building process, choosing which specific characters and elements mattered most to him personally, helping paint sections himself, made an enormous difference in his genuine, lasting excitement about the finished space.
Early in the project, I made a few decorative choices based purely on my own research into the game’s most visually recognizable elements without checking in with him first, and a couple of these choices, while accurate to the game itself, didn’t actually reflect his own specific favorite characters or gameplay interests, resulting in a room that looked correct but didn’t fully resonate personally in the way the more collaborative elements eventually did.
Once I shifted toward genuinely involving him in ongoing decisions throughout the rest of the project, which specific characters to feature, which colors felt right, which elements he wanted to help build or paint himself, the room’s overall success and his lasting enthusiasm for the finished space improved considerably compared to the earlier, more unilaterally decided elements.
This principle extends well beyond just Minecraft-themed rooms specifically, genuine collaboration and input from the actual child whose space is being designed consistently produces more meaningful, lasting results than even the most technically accurate, well-executed adult-designed theming applied without that direct involvement and input throughout the process.
Frequently Asked Questions
How much does a full Minecraft-themed bedroom typically cost to build? It varies enormously depending on how many DIY versus purchased licensed elements you incorporate. A budget approach using primarily paint and repurposed furniture can cost relatively little, while incorporating multiple licensed furniture and decor pieces increases the total investment significantly.
What age range is this kind of themed room best suited for? Minecraft appeals to a notably wide age range, roughly six through early teens, though older kids may prefer more subtle, specific references, like the pickaxe hook or ore decal details, over more overtly obvious elements like large character decals throughout the room.
How do I keep a themed room from feeling outdated if my child’s interests change? Prioritizing paint-based and easily removable decorative elements over permanent structural changes makes future updates considerably easier if a child’s specific interests shift over time, which is worth considering during the initial planning process.
Can these ideas work in a rented space with restrictions on painting? Yes, many of the ideas on this list, decals, plush items, painted furniture pieces that can move with you, and modular cube storage, work well even in spaces where wall painting isn’t permitted or practical.
Final Thoughts
That initial, slightly daunting birthday request from my nephew turned into one of the most genuinely rewarding room projects I’ve tackled, not because of any single element on this list, but because of how much his own direct involvement and specific personal interests shaped the final, deeply resonant result. Start with the elements that connect most specifically to how your own child actually plays and enjoys the game, involve them directly in as much of the process as their age and skill level allows, and let the room’s specific details reflect their genuine interests rather than only the game’s most generic, universally recognized visual elements. A themed room built this way doesn’t just look the part, it becomes a genuinely beloved, personally meaningful space they’ll want to spend real time in for years to come.