
Faux ceiling beams are one of the easiest ways to make a room feel warmer, more custom, and more architecturally interesting without the cost of real structural beams. They instantly add texture and depth to ceilings while helping spaces feel more cozy, high-end, and professionally designed.
The best part is that modern faux beams are surprisingly lightweight and beginner-friendly to install. Many are made from polyurethane or hollow wood, which means they look realistic without requiring major construction or structural reinforcement. With proper planning, measuring, and patience, most homeowners can install faux beams themselves over a weekend.
Faux beams work beautifully in:
- Living rooms
- Kitchens
- Bedrooms
- Vaulted ceilings
- Farmhouse interiors
The key to a successful installation is taking your time during preparation. Accurate measurements, proper anchor placement, and careful installation all make a huge difference in how polished the finished ceiling looks.
Here’s a complete step-by-step guide to installing a faux beam ceiling yourself — no contractor needed.
Step 1: Let the Faux Beams Acclimate Before Installation
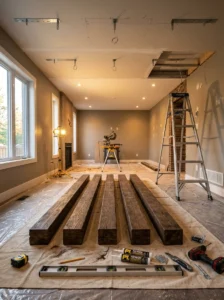
Before you begin measuring or installing anything, it’s important to allow the faux beams to sit in the room where they’ll eventually be installed. This step is often skipped by beginners, but it can make a huge difference in the final fit and appearance of the beams.
Even though faux beams are lighter than real wood, many polyurethane and wood-style beams still react slightly to temperature and humidity changes. Allowing them to acclimate helps prevent shrinking, expansion, or small fit issues after installation.
Place the beams flat inside the room for at least:
- 24 to 48 hours
- Longer in very humid climates
- Away from direct moisture or heat
This gives the material time to adjust naturally to the room conditions before cutting and fastening.
It’s also a good opportunity to inspect the beams for:
- Damage
- Warping
- Color consistency
- Manufacturing imperfections
While waiting, start planning your ceiling layout carefully. Taking photos of the room and sketching beam placement directly onto printed images can help you visualize the finished design before making permanent cuts.
Preparation may feel slow at first, but careful planning during this stage usually prevents the biggest DIY installation mistakes later.
Step 2: Measure the Ceiling and Cut Mounting Blocks

Accurate measurements are one of the most important parts of installing faux ceiling beams successfully. Even small mistakes can become very noticeable once the beams are attached overhead, so take your time during this step and double-check every measurement carefully.
Start by measuring:
- Ceiling width
- Ceiling length
- Beam placement spacing
- Inside dimensions of the faux beam
The inside beam measurements are especially important because they determine the size of the wood mounting blocks that will hold the beam securely against the ceiling.
Once measurements are confirmed, cut wooden mounting blocks to fit snugly inside the hollow beam structure. These blocks act as hidden anchors that allow the beam to attach securely without visible support hardware.
When planning beam spacing, think carefully about the visual balance of the room. Evenly spaced beams generally create the cleanest and most professional appearance.
A helpful trick is using painter’s tape on the ceiling to preview the layout before installation. This allows you to adjust spacing visually before making permanent decisions.
Always follow the classic carpentry rule:
👉 Measure twice, cut once.
Small adjustments are easy during planning but far more difficult after the beams are cut and mounted.
Step 3: Mark Beam Placement and Locate Ceiling Studs
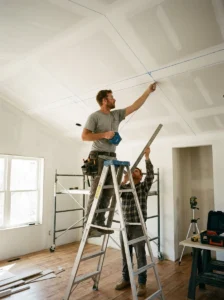
Once your measurements are finalized, the next step is marking exactly where the faux beams will sit on the ceiling. Accurate placement is important because crooked or uneven beams can dramatically affect how professional the finished room looks.
Use painter’s tape or chalk lines to outline the beam locations directly on the ceiling. Keeping the lines inside the actual beam edges helps ensure they remain hidden after installation.
At this stage, you should also locate the ceiling studs or joists using a stud finder. These structural points are where the mounting blocks will be attached.
Mark each stud location clearly with:
- Pencil marks
- Chalk
- Small pieces of tape
Try to keep marks visible outside the final beam edges so they remain accessible during installation.
If ceiling studs do not align perfectly with your beam layout, you may need:
- Ceiling anchors
- Toggle bolts
- Heavy-duty drywall mollies
However, securing directly into studs whenever possible creates the strongest and safest installation.
This step may feel tedious, but careful marking prevents alignment problems later and helps the installation process move much more smoothly once the beams are lifted into place.
Step 4: Attach the Mounting Blocks Securely

The mounting blocks are what actually support the faux beams, so securing them properly is one of the most important parts of the entire project. These hidden wood blocks create the structure that the hollow beam slides over during installation.
Position the blocks directly along your marked beam layout lines and align them with the ceiling studs whenever possible.
Typically, mounting blocks should be spaced:
- Every 3 to 6 feet
- Closer together for longer beams
- Near beam joints or seams
Use strong wood screws to secure the blocks firmly into the studs. If installing into drywall without a stud, use heavy-duty anchors rated for ceiling loads.
Make sure every block sits straight and level because uneven blocks can cause visible gaps between the beam and ceiling later.
If you plan to hang:
- Pendant lights
- Ceiling fans
- Plants
- Decorative fixtures
then install additional structural support before attaching the beam.
At this stage, many DIYers find it helpful to test-fit the beam temporarily to confirm the blocks align properly before adhesive is added.
Solid anchor installation is what gives faux beams their clean finished appearance and long-term durability.
Step 5: Cut the Beam and Apply Construction Adhesive
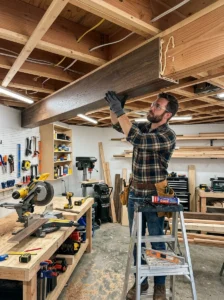
Now that the anchors are installed, it’s time to cut the faux beam to its final size. Carefully transfer your measurements and double-check them before making any cuts.
Many installers intentionally cut beams slightly oversized to create a tighter and cleaner fit against the walls.
Depending on the beam material, you can use:
- Miter saws
- Circular saws
- Hand saws
- Fine-tooth blades
After cutting, lift the beam temporarily into place to verify:
- Length
- Alignment
- Fit against the ceiling
Once everything fits correctly, apply construction adhesive along the top inside edges of the beam where it will contact the ceiling and mounting blocks.
Popular adhesive options include:
- PL Premium Construction Adhesive
- Liquid Nails Heavy Duty
Apply the adhesive evenly but avoid excessive amounts that may squeeze out during installation.
The adhesive helps stabilize the beam while reducing movement or visible gaps after installation.
Careful fitting during this stage creates the clean seamless appearance that makes faux beams look professionally installed.
Step 6: Lift and Fasten the Beam Into Position
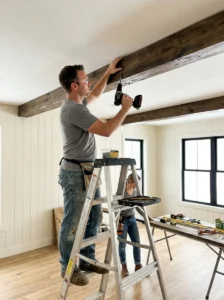
With the adhesive applied, carefully lift the faux beam into position over the mounting blocks. Longer beams may require one or two helpers because maneuvering large pieces overhead can become awkward and difficult alone.
Press the beam firmly against the ceiling while aligning it with the marked layout lines.
Once positioned correctly:
- Drive screws through the beam sides
- Fasten directly into the mounting blocks
- Keep screws evenly spaced
Many installers place screws near beam edges where they can later be hidden more easily with filler.
Work slowly and check alignment continuously as you secure the beam. Small shifts during fastening can become noticeable once the installation is complete.
If adhesive squeezes out along the ceiling edges, wipe it away immediately before it dries.
The combination of mounting blocks, screws, and construction adhesive creates a secure installation that keeps the beam stable long term.
At this point, the room usually starts transforming dramatically as the architectural detail instantly adds warmth and visual depth to the ceiling.
Step 7: Finish the Beam for a Clean Professional Look

The final step is cleaning up the installation so the faux beam looks seamless and professionally finished. This stage makes a huge difference in whether the project feels DIY or truly custom-built.
Begin by removing:
- Excess adhesive
- Pencil marks
- Dust
- Installation debris
If small gaps appear where the beam meets the wall or ceiling, apply paintable caulk for a cleaner transition.
Next, fill visible screw holes using:
- Wood filler
- Color-matched filler
- Touch-up stain or paint if needed
Allow filler to dry fully before lightly sanding smooth.
Take time to inspect:
- Beam alignment
- Gaps
- Corners
- Overall symmetry
Sometimes small touch-ups make the biggest difference in the final appearance.
After cleanup, the finished faux beams instantly create:
- Warmth
- Architectural texture
- Luxury character
- Custom ceiling detail
without requiring major renovation costs or professional contractors.
The result is a ceiling that feels far more elevated, cozy, and visually impressive while still being completely achievable as a DIY project.
CONCLUSION
Installing faux ceiling beams is one of the most effective ways to add warmth, texture, and luxury character to a room without major construction.
With careful measuring, proper mounting, and thoughtful finishing, homeowners can create a custom designer ceiling look entirely on their own.
The key is patience during preparation and attention to detail throughout each installation step.