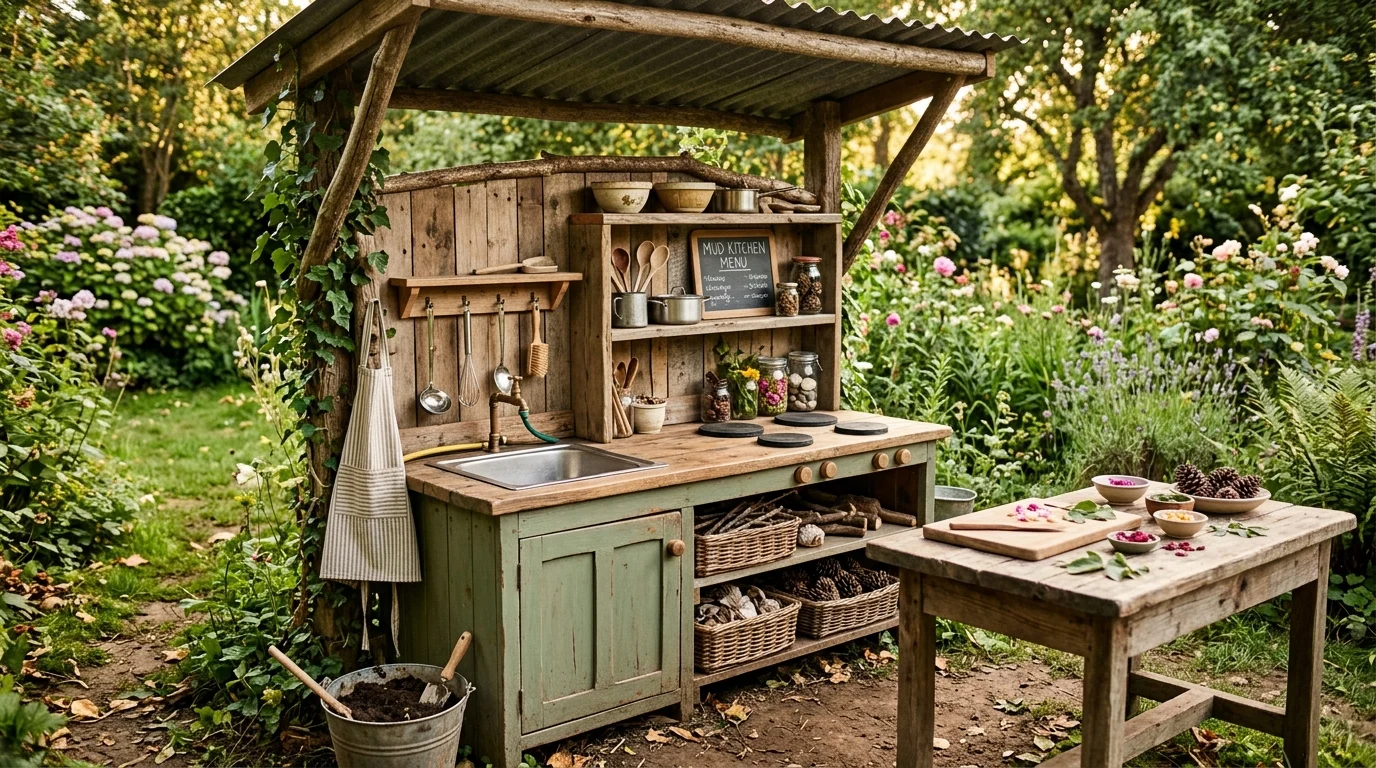
My niece was about four years old when I first built her a mud kitchen out of leftover materials from a fence project in my backyard, mostly because I was tired of finding my actual kitchen pots and pans scattered across the yard every weekend she visited. What started as a simple, slapped-together solution using an old pallet and a discarded sink basin turned into one of the most consistently used pieces of outdoor play equipment I’ve ever built, she and her younger cousins have played at that mud kitchen for hours at a time, well beyond what I expected from what was initially just a way to keep my actual kitchenware indoors where it belonged.
Since that first attempt, I’ve built or helped refine a few more mud kitchens for friends and family, each one teaching me something new about what actually keeps kids engaged versus what looks appealing in photos but doesn’t hold their interest for long. The most successful ones share a few common threads, genuine sensory variety, enough open-ended play potential that kids can invent their own games rather than following a fixed script, and just enough durability to survive genuine outdoor weathering and rough play.
Here are 21 DIY mud kitchen ideas I’ve built myself, watched work well for other families, or refined through actual trial and error with real kids testing them out, all aimed at creating something that gets used for hours rather than just admired for a weekend before being ignored.
1. Repurpose an Old Kitchen Cabinet or Dresser
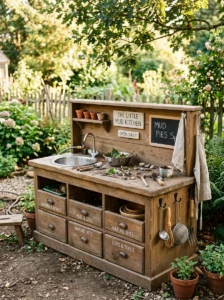
My very first mud kitchen attempt used an old dresser a neighbor was getting rid of, which I modified by cutting a hole in the top for a discarded sink basin and adding a few hooks for hanging utensils. Repurposing existing furniture like this is genuinely one of the most cost-effective ways to build a mud kitchen, since the basic structure and storage drawers are already built in.
I sanded down any rough edges and applied an exterior-grade sealant to help the wood withstand outdoor weather conditions better than it would have without any treatment, since standard indoor furniture isn’t designed for consistent outdoor exposure to rain and humidity. This weatherproofing step, easy to skip in the excitement of getting a mud kitchen built quickly, made a real difference in how long that first dresser-based kitchen actually lasted before needing replacement.
For anyone with access to an old dresser, cabinet, or similar furniture piece nobody’s using anymore, this remains one of the fastest, lowest-cost ways to get a functional mud kitchen structure in place before adding any of the more specific features covered in the rest of this list.
2. Install a Real (or Realistic) Sink Basin
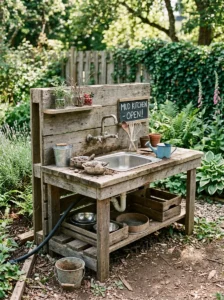
The sink became, without question, the single most-used feature of every mud kitchen I’ve built, kids gravitate toward the actual pouring and washing activity more than almost any other single element. I used an old stainless steel sink basin from a bathroom renovation for my niece’s kitchen, cut into the dresser top and secured with basic silicone sealant around the edges.
For anyone without access to a genuine discarded sink basin, a large plastic basin or even a sturdy metal mixing bowl set into a cutout can serve a similar function, though a genuine sink shape, with its drain opening, adds a nice layer of realism that pure basins don’t quite replicate. I’d recommend, if using a real sink with a drain, either capping the drain opening or running a simple hose extension to direct water away from the base of the structure, preventing water pooling that can accelerate wood rot over time.
This single feature, more than almost any other on this list, tends to determine how much genuine, sustained play interest a mud kitchen generates, so I’d prioritize getting this element right before investing heavily in some of the more decorative additions covered later in this list.
3. Add a Working Water Source
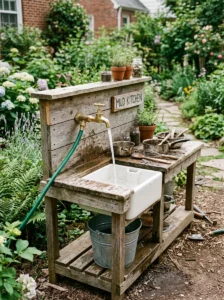
Beyond just a basin, connecting an actual water source dramatically increases how long kids stay engaged with a mud kitchen. I installed a simple garden hose connection with a basic on-off valve positioned at a height my niece could reach and operate independently, which let her fill pots, “wash dishes,” and generally engage with actual flowing water rather than just a static basin that needed to be manually filled.
For a more elaborate setup, some families install a small solar-powered or manually operated hand pump specifically designed for outdoor play kitchens, which lets kids pump water themselves rather than relying on an adult to turn on a hose connection, adding another layer of independent, hands-on engagement to the whole play experience.
Safety and practicality matter here too, I’d recommend positioning any water connection where runoff won’t create a persistent muddy mess in an inconvenient area of your yard, and considering whether your specific climate and water access make a permanent connection practical or whether a simple, refillable water container makes more sense for your situation.
4. Use a Repurposed Pallet for a Simple Frame
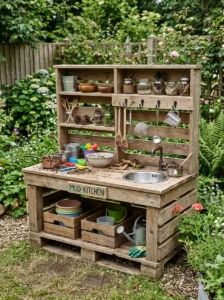
For families wanting an even more budget-friendly starting structure than a full dresser or cabinet, a simple wood pallet, often available for free from local businesses, can form the basic frame of a mud kitchen with some modification. A friend built her son’s mud kitchen almost entirely from two pallets, one positioned horizontally as a base counter and another cut down and mounted vertically for additional shelving and hanging storage.
She sanded the pallet wood thoroughly to remove any splinters or rough edges, a genuinely important safety step given how much direct hand contact kids have with the structure during play, and applied several coats of exterior sealant before adding any of the specific play features to the basic frame.
This pallet-based approach requires more assembly and modification work than repurposing existing furniture, but it’s often the lowest-cost starting point for anyone building a mud kitchen entirely from scratch rather than working from an existing furniture piece.
5. Add Chalkboard Paint for a Menu Board
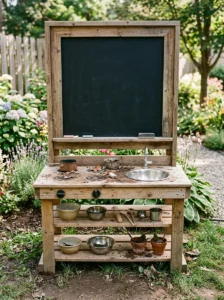
A small addition that ended up getting more use than I initially expected was a section of chalkboard paint applied to one side panel of my niece’s mud kitchen, which she uses to write out “menus” and “orders” as part of her imaginative play, adding a literacy and creative writing element to what would otherwise be purely sensory, tactile play.
This is one of the easiest, lowest-cost additions on this entire list, requiring just a can of exterior-rated chalkboard paint and a paintbrush, but it consistently generates a different kind of play than the mud and water elements alone, kids “taking orders” from siblings or parents, writing out pretend prices, drawing pictures of their mud creations.
I’d recommend positioning the chalkboard section at a height comfortable for your specific child to reach and write on comfortably, adjusting for their current height rather than a standard adult reference point, since this feature works best when kids can use it independently without needing to be lifted or assisted.
6. Install Real (or Realistic) Stove Burners
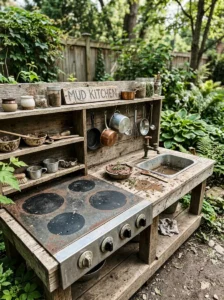
Beyond the sink, adding a stove element with realistic-looking burners significantly expands the pretend cooking play possibilities. I painted simple circular burner shapes directly onto an old metal baking sheet mounted to the mud kitchen’s surface, giving my niece a designated “cooking” area distinct from the sink’s washing and pouring activities.
For a slightly more elaborate version, some parents install actual, non-functional stove knobs, salvaged from an old, discarded stove or purchased separately, which add a satisfying tactile clicking or turning sensation that pure painted burners don’t provide. This small addition of genuine mechanical interaction tends to add meaningfully to how long kids stay engaged with the pretend cooking element specifically.
This is a relatively simple addition in terms of materials and effort required, but it rounds out the mud kitchen’s play possibilities beyond just water-based activities, giving kids a distinct “cooking” zone to complement the “washing” zone the sink provides.
7. Provide Ample Storage for Play Utensils
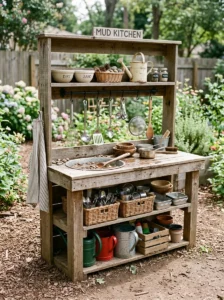
Without adequate storage, mud kitchen accessories, pots, spoons, pretend food items, tend to end up scattered across the yard rather than staying organized and available for repeated play sessions. I added a combination of open shelving, salvaged from the original dresser’s structure, and a few hooks mounted along one side specifically for hanging metal spoons, small pots, and a colander.
This organized storage matters more than it might initially seem, since kids are considerably more likely to engage in sustained, elaborate pretend play when their tools and props are readily visible and accessible, rather than needing to search for scattered items before starting to play. I’d recommend involving your child in organizing this storage initially, letting them decide where specific items go, which tends to increase their sense of ownership over the space and their likelihood of helping maintain that organization afterward.
For anyone building a mud kitchen from scratch, planning dedicated storage space from the very beginning, rather than adding it as an afterthought once the basic structure exists, tends to result in a more genuinely functional and sustainably organized play space over time.
8. Use Weather-Resistant Materials Throughout
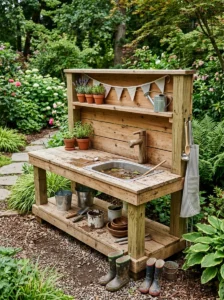
One of the most important lessons I learned from my first mud kitchen attempt was underestimating how much genuine outdoor exposure, rain, sun, humidity, would affect materials not specifically treated or chosen for outdoor durability. That first dresser, despite my sealant application, eventually needed replacement sooner than I’d hoped, partly because the underlying particleboard construction simply wasn’t designed for consistent outdoor conditions.
For subsequent mud kitchens, I specifically sought out solid wood construction, cedar or pressure-treated pine specifically, rather than particleboard or veneer materials, which hold up considerably better against genuine outdoor weathering over multiple seasons. I also reapply exterior sealant annually as routine maintenance, which has significantly extended the lifespan of these subsequent builds compared to that initial, less carefully considered first attempt.
For anyone planning to build a mud kitchen intended for genuine long-term outdoor use rather than a single season, investing in these more weather-appropriate materials from the start, even at a higher initial cost, tends to prove more cost-effective than needing to replace a poorly suited structure after just one or two seasons of exposure.
9. Add a Roof or Cover for Rain Protection
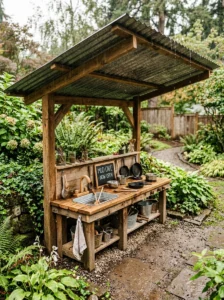
Beyond material choice, physically protecting the mud kitchen structure itself from direct rain exposure significantly extends its lifespan regardless of the specific materials used. I added a simple, sloped corrugated metal roof panel over my niece’s mud kitchen, mounted on basic wood supports extending from the main structure, which keeps the worst of direct rain exposure off the primary play surface and storage areas.
This addition also provides a practical benefit beyond structure preservation, allowing continued play even during light rain or immediately after a rain shower, when an uncovered mud kitchen’s play surfaces would otherwise be too saturated for comfortable use. A friend used a simple retractable canvas awning instead of a fixed metal roof, providing similar rain protection while allowing the option to fully open the space during clear weather for a more open, unobstructed play experience.
This is a moderately more involved addition compared to some other ideas on this list, requiring some basic carpentry to construct stable roof supports, but it genuinely extends both the mud kitchen’s lifespan and its practical usability across a wider range of weather conditions.
10. Incorporate a Small Table for Additional Prep Space
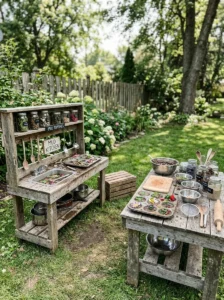
Beyond the main counter and sink area, adding a small, separate table nearby provides additional surface space for more elaborate pretend cooking projects, mixing larger batches of “mud pie” ingredients, for example, without competing for space with the sink and stove elements on the main structure itself.
I positioned a small, weathered wood table adjacent to my niece’s mud kitchen specifically for this purpose, which she now uses for more elaborate “baking” projects that require more surface area than the main kitchen structure alone comfortably provides. This additional table also accommodates multiple children playing simultaneously more comfortably than a single, more compact mud kitchen structure might on its own.
For families with multiple children or who frequently host friends for playdates, this additional table space becomes particularly valuable, allowing several kids to engage in parallel pretend cooking activities without constantly competing for the same limited counter space.
11. Add Natural Loose Parts for Open-Ended Play
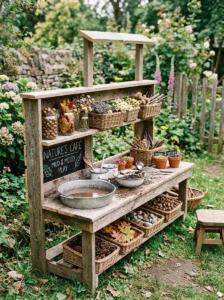
Beyond the structure itself, the actual “ingredients” available for pretend cooking matter enormously for how long kids stay engaged. I keep a rotating collection of natural loose parts, pinecones, smooth stones, twigs, and fallen leaves, in a designated basket near the mud kitchen, which my niece and her cousins use as pretend food ingredients, mixing and matching them in different combinations for their imaginative cooking play.
This kind of open-ended material, rather than fixed, single-purpose pretend food toys, tends to generate more varied and sustained play, since children can assign different meanings and uses to the same natural materials depending on whatever specific game or scenario they’ve invented that particular day. I periodically refresh this collection with different natural materials depending on the season, adding pine needles or acorns in fall, for example, which keeps the available “ingredients” feeling fresh and interesting over time.
This is one of the lowest-cost additions on this entire list, since these natural materials are typically freely available in most yards or nearby outdoor spaces, but it consistently provides some of the most genuinely open-ended and sustained play value of any single element I’ve incorporated.
12. Provide a Mud-Making Station With Actual Dirt
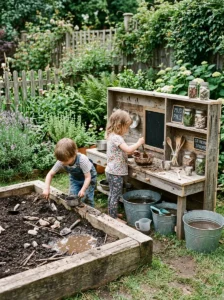
Somewhat obviously given the “mud kitchen” name, having an actual designated area with loose dirt or soil, distinct from the rest of your yard, provides the core sensory material that makes this kind of play so engaging in the first place. I created a small, contained dirt pit adjacent to my niece’s mud kitchen, using a simple wood frame to contain the loose soil and prevent it from spreading excessively into the surrounding grass.
This dedicated dirt area, combined with the water source discussed earlier, allows for the actual mud-making process that forms the core sensory experience of this kind of play, mixing water and dirt to different consistencies for various pretend cooking purposes. I’d recommend, for anyone concerned about mess spreading beyond the intended play area, containing this dirt section with a simple raised wood border, which helps keep the loose soil contained to the designated space rather than migrating across your entire yard.
This is a genuinely essential element for authentic mud kitchen play, and I’d prioritize including some version of a contained dirt or soil area, even a simple large container filled with potting soil for smaller spaces, alongside whatever structural mud kitchen elements you build.
13. Add a Bell or Small Instrument for Imaginative Play
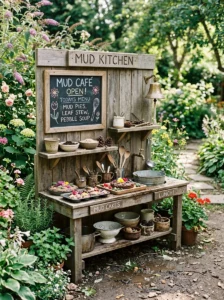
A small, somewhat unexpected addition that generated more play value than I anticipated was a small bell mounted near my niece’s mud kitchen, which she rings to signal when her pretend meals are “ready,” adding a small performative, imaginative element to the overall pretend cooking experience.
This kind of small sensory addition, a bell, a simple wind chime, even an old cowbell salvaged from elsewhere, adds another layer to the imaginative play beyond just the tactile mud and water elements, encouraging a more narrative, role-play style of engagement where kids act out serving meals to family members or stuffed animal “customers.”
This is a minor, low-cost addition, but it’s a good example of how small, unexpected sensory elements, sound in this particular case, can meaningfully expand the range of imaginative play a mud kitchen supports beyond its core physical features.
14. Include a Small Chalkboard for Drawing Pretend Food
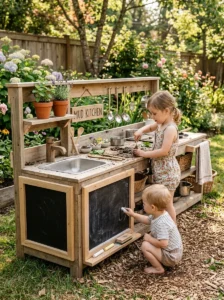
Beyond the menu chalkboard mentioned earlier, adding a separate, smaller chalkboard section specifically positioned at a lower height for younger children to draw their own pretend food creations provides another creative outlet distinct from the primary sensory mud and water play.
A friend added this specifically for her younger child, who wasn’t yet interested in the more elaborate menu-writing activity her older sibling engaged in, but who enjoyed simply drawing pictures of imagined “meals” as part of her own parallel pretend cooking play. This kind of age-appropriate variation within the same mud kitchen structure allows siblings of different ages to engage meaningfully with the same play space simultaneously, each in a way that suits their specific developmental stage.
This is a relatively simple, low-cost addition, similar to the primary chalkboard element, but positioning it specifically for a younger child’s height and interests can extend a single mud kitchen’s usability across a wider age range within the same family.
15. Use Old Muffin Tins and Baking Trays as Play Props
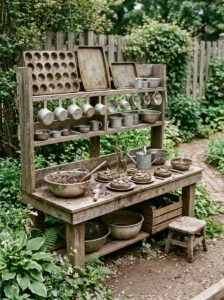
Beyond dedicated play kitchen toys, actual discarded kitchen items, old muffin tins, baking sheets, and mismatched measuring cups no longer needed for genuine cooking, make excellent, durable mud kitchen props that hold up considerably better to outdoor rough play than more delicate plastic play kitchen toys designed for indoor use.
I keep a small collection of these repurposed items in my niece’s mud kitchen storage area, which she uses for measuring, mixing, and “baking” her mud creations, the metal materials specifically standing up much better to consistent outdoor exposure and rough handling than plastic alternatives would over the same period of use. This is also a genuinely cost-free way to stock a mud kitchen with quality props, simply repurposing items from your own kitchen that would otherwise be discarded rather than purchasing new play-specific equipment.
I’d recommend, when selecting which old kitchen items to repurpose this way, prioritizing metal over plastic wherever possible, given how much more durable metal tends to be under genuine outdoor weather exposure and the rougher handling typical of active outdoor play.
16. Add a Simple Apron Hook for Role-Play
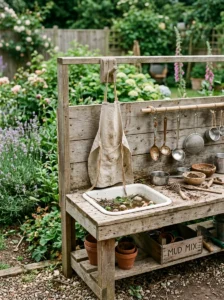
A small addition that added a nice layer of role-play authenticity was a simple hook mounted near the mud kitchen specifically for hanging a child-sized apron, which my niece now puts on each time before starting her pretend cooking activities, adding a small ritual element to the overall play experience.
This kind of small, ritualistic addition, putting on an apron before “cooking,” similar to how actual cooking involves specific preparatory actions, adds a layer of realistic role-play that enhances the overall imaginative experience beyond just the physical mud kitchen structure and materials themselves.
This is one of the simplest, lowest-cost additions on this entire list, requiring just a hook and an inexpensive child-sized apron, but it’s a good example of how small details supporting genuine role-play authenticity can meaningfully add to a mud kitchen’s overall engagement value.
17. Incorporate a Small Bench or Stool for Seating
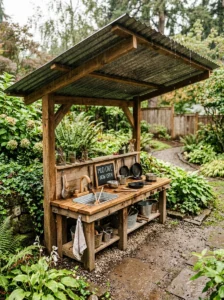
Beyond the standing play the mud kitchen structure itself supports, adding a small bench or stool nearby provides a seating option for either supervising adults or for kids who want to sit while working on a more involved “recipe” or pretend meal preparation.
I added a simple wood bench beside my niece’s mud kitchen, sized comfortably for both her and an adult to sit together during play, which has become a useful spot for the more collaborative aspects of her pretend cooking, sitting together to “taste test” a finished mud creation, for example, rather than only standing throughout the entire play session.
This is a relatively simple furniture addition, but it supports a different kind of engagement, more collaborative, conversational play, distinct from the primarily solo or parallel play that the standing mud kitchen structure itself tends to encourage on its own.
18. Use Repurposed Tires or Stumps for a Rustic Aesthetic
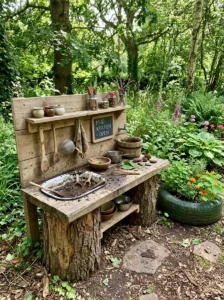
For families wanting a more natural, rustic overall aesthetic rather than a structure built primarily from repurposed furniture, using materials like large tree stumps, cut to appropriate heights, or repurposed tractor tires as the base structural elements can create a genuinely unique, natural-feeling mud kitchen distinct from a more conventional furniture-based build.
A friend built her mud kitchen almost entirely around two large tree stumps from a recently removed backyard tree, topping them with a simple wood plank counter and adding the sink, storage, and other features discussed throughout this list onto that more rustic base structure. This approach requires access to these specific natural materials, which won’t be practical for every family, but for those with access to them, it provides a genuinely distinctive alternative to the more common furniture-based mud kitchen approach.
This kind of rustic, natural-material approach also tends to blend more seamlessly into a naturalistic backyard landscape design, for anyone specifically prioritizing that kind of overall outdoor aesthetic alongside the mud kitchen’s play function.
19. Add a Small Chalkboard-Painted Serving Tray
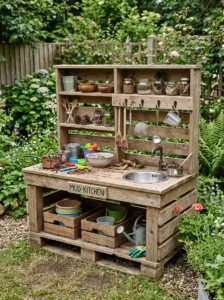
Beyond the larger chalkboard sections discussed earlier, a small, individual chalkboard-painted serving tray provides a portable surface for kids to “write” specific menu items for individual servings, which they can then carry to family members or friends as part of their pretend serving play, adding mobility to the imaginative cooking scenario beyond just the fixed mud kitchen structure itself.
This small, portable addition extends the play beyond the immediate mud kitchen area, encouraging kids to actually deliver their pretend creations elsewhere in the yard or to specific “customers,” adding a broader spatial and social dimension to what might otherwise remain confined entirely to the mud kitchen’s immediate physical footprint.
This is a low-cost, easily added prop, essentially just a small wood tray and some chalkboard paint, but it’s a good example of how small additions can meaningfully expand the physical and social scope of a mud kitchen’s overall play possibilities.
20. Rotate Seasonal Themes and Materials
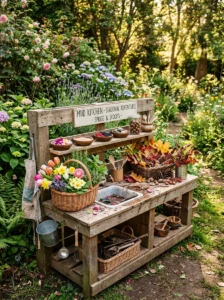
To keep a mud kitchen feeling fresh and engaging well beyond the initial novelty period, I’ve found it genuinely helpful to rotate specific seasonal themes and available materials throughout the year, adding pinecones and acorns in the fall, fresh flower petals in the spring, and even small ice elements during colder months for additional sensory variety.
This kind of seasonal rotation prevents the mud kitchen from becoming stale or ignored after the initial few months of heavy use, which is a genuine risk with any single, static play structure regardless of how well-designed it initially is. I specifically look for what natural materials are seasonally available in my own yard and surrounding area, incorporating whatever’s currently in season rather than trying to maintain the exact same materials and theme throughout the entire year.
This is a low-cost, ongoing maintenance practice rather than a single structural addition, but it’s one of the most effective strategies I’ve found for maintaining genuine long-term engagement with a mud kitchen well beyond its first season of novelty.
21. Involve Kids in the Building Process Itself
The final and perhaps most important lesson from building multiple mud kitchens over the years is that involving children directly in the actual construction and design process, even in small, age-appropriate ways, painting a section, choosing where specific hooks or shelves go, tends to increase their long-term investment and engagement with the finished structure considerably more than presenting them with an already fully completed, adult-designed space.
My niece helped paint the chalkboard section of her mud kitchen herself, and she still specifically points out that section as “her part” of the whole structure years later, a level of ownership and continued interest that I don’t think would have developed the same way if the entire structure had simply appeared fully finished without any of her direct involvement in creating it.
This principle, meaningful involvement in the creation process itself, applies well beyond just mud kitchens specifically, but it’s a particularly good fit for this kind of project, given how naturally hands-on and tactile the whole concept already is, extending that same hands-on engagement into the building process itself rather than limiting it purely to the eventual play activities the finished structure supports.
Frequently Asked Questions
What age range is a mud kitchen best suited for? Mud kitchens tend to work well for children roughly ages two through eight or nine, though specific features, chalkboard height, tool complexity, can be adjusted to suit a narrower age range within that broader window.
How much does a DIY mud kitchen typically cost to build? Costs vary enormously depending on materials, repurposing an old dresser or pallet with recycled kitchen items can cost very little beyond basic hardware and sealant, while more elaborate builds with new lumber, a roof structure, and a plumbed water connection can cost considerably more.
How do I keep a mud kitchen from becoming a maintenance headache? Prioritize weather-resistant materials and an annual sealant reapplication, add some form of rain cover if possible, and contain the dirt or mud area with a simple border to prevent excessive mess spreading beyond the intended play zone.
Is a mud kitchen appropriate for a small backyard or shared outdoor space? Yes, smaller versions using a single repurposed piece of furniture and a contained dirt area in a large planter or bin can work well even in more limited outdoor spaces, without requiring the more elaborate footprint of a full-sized build.
Final Thoughts
That first, somewhat accidental mud kitchen I built mainly to keep my actual kitchenware indoors ended up teaching me a lot about what genuinely sustains children’s imaginative outdoor play over the long term, sensory variety, open-ended materials, and genuine involvement in the space’s creation and ongoing use. Start with the core elements, a sturdy structure, a working sink, and an accessible dirt and water source, then layer in the smaller, more playful additions gradually based on what specifically captures your own child’s interest. Like most of the best kids’ play spaces, the mud kitchens that get used for years rather than abandoned after a season are the ones that keep evolving alongside the children actually playing in them.