For years, my “dressing room” was really just a corner of our bedroom closet with a single hanging bulb and a small stool wedged between two rows of clothes. I never thought much about it, since I assumed dedicated dressing rooms were reserved for much larger homes than ours. That changed when we converted a small, awkwardly shaped spare bedroom that had mostly become a catch-all storage space into an actual dressing room, and the difference it made to my daily routine surprised me more than I expected going in.
What I learned through that process, and later while helping a friend design her own dressing room in a completely different style, is that a genuinely luxe getting-ready space doesn’t require a mansion-sized closet or an unlimited budget. It requires intentional layout, good lighting, and a handful of design choices that make the room feel like a real destination rather than an overflow storage area. Getting dressed each morning went from a rushed, slightly chaotic task to something I actually look forward to, which is a bigger shift than I anticipated from what started as a fairly modest renovation.
If you’re dreaming of your own dressing room, whether from scratch or converting an existing space, here are 20 ideas I’ve personally used, seen succeed in other homes, or researched thoroughly enough to recommend with confidence.
Why a Dedicated Dressing Room Is Worth the Investment
A dressing room does more than just store clothes, it creates a ritual space that separates the act of getting ready from the rest of your daily routine. In my own experience, having a dedicated room for this purpose has made mornings feel calmer and more organized, since everything from outfit planning to accessories has its own designated home rather than being scattered across a bedroom or shared closet.
1. Install a Statement Chandelier or Pendant Light
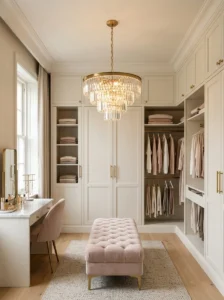
Nothing signals “luxe” quite like a striking overhead light fixture, and a dressing room is one of the few spaces in a home where a bold, glamorous chandelier genuinely makes sense functionally as well as aesthetically. I added a small crystal-style chandelier to the center of our converted dressing room, and beyond the obvious visual impact, it provides much better overall illumination than the single bulb we’d relied on previously. Guests who see the space for the first time almost always comment on the fixture before anything else in the room, which tells me how much of a first impression a great light fixture can create. I’d recommend pairing any statement fixture with a dimmer switch, since the full brightness needed for outfit selection isn’t always what you want during quieter moments, like sitting at a vanity in the evening. Choosing the right scale matters too, a fixture too small will feel lost in a larger room, while one too large can overwhelm a smaller space, so I’d suggest measuring your ceiling height and room dimensions carefully, or consulting a lighting guide, before making a final selection for this particular investment. Beyond the visual drama, I’ve also found that a well-chosen statement fixture can subtly influence how the entire room is perceived even before anything else is installed, since it sets an expectation of quality that the rest of the design then has to live up to. When we were still deciding between a few different chandelier options, I taped a paper cutout matching each fixture’s approximate dimensions to the ceiling and stood back to evaluate the proportions in context, which turned out to be far more informative than simply comparing photos online. I’d genuinely recommend this low-cost trick to anyone hesitant about committing to a bold overhead fixture sight unseen, since it removes much of the guesswork involved in a purchase that’s often difficult or expensive to return once installed.
2. Add a Vanity With a Well-Lit Mirror
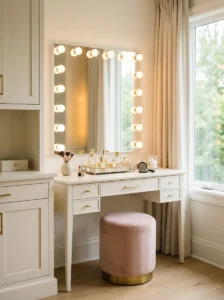
A proper vanity area, complete with a mirror surrounded by warm, even lighting, is arguably the single most functional element of any dressing room. We added a simple vanity table with a row of small bulbs framing the mirror, mimicking the classic backstage-style lighting often seen in professional makeup rooms. This setup eliminates the harsh shadows that overhead lighting alone tends to create, making it far easier to apply makeup or simply see yourself clearly while getting ready in the morning. I chose warm-toned bulbs specifically, since cooler lighting can distort how colors actually read on your skin and clothing, leading to makeup or outfit choices that look different once you step outside under natural light. Beyond the practical benefit, the vanity area has become something of a personal retreat within the room, a spot where I sit each morning with a cup of coffee before the rest of the household wakes up, which has added an unexpected daily ritual that I genuinely look forward to. I also learned through some trial and error that mirror placement relative to natural light sources matters more than I initially realized, since positioning the vanity directly across from our small window meant the bulb lighting sometimes competed awkwardly with daylight depending on the time of day. Adjusting the vanity’s position slightly to work alongside rather than against the window’s natural light solved this, and now the space transitions smoothly from daylight in the morning to the warm bulb lighting taking over more fully by evening. For anyone planning their own vanity setup, I’d recommend testing the lighting at different times of day before finalizing the exact placement, since a spot that looks perfectly lit at noon can feel entirely different once the sun starts to set.
3. Use Glass-Front Cabinetry to Display Clothing and Accessories
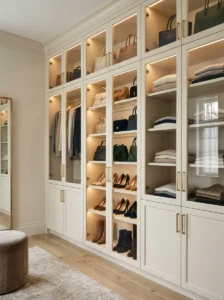
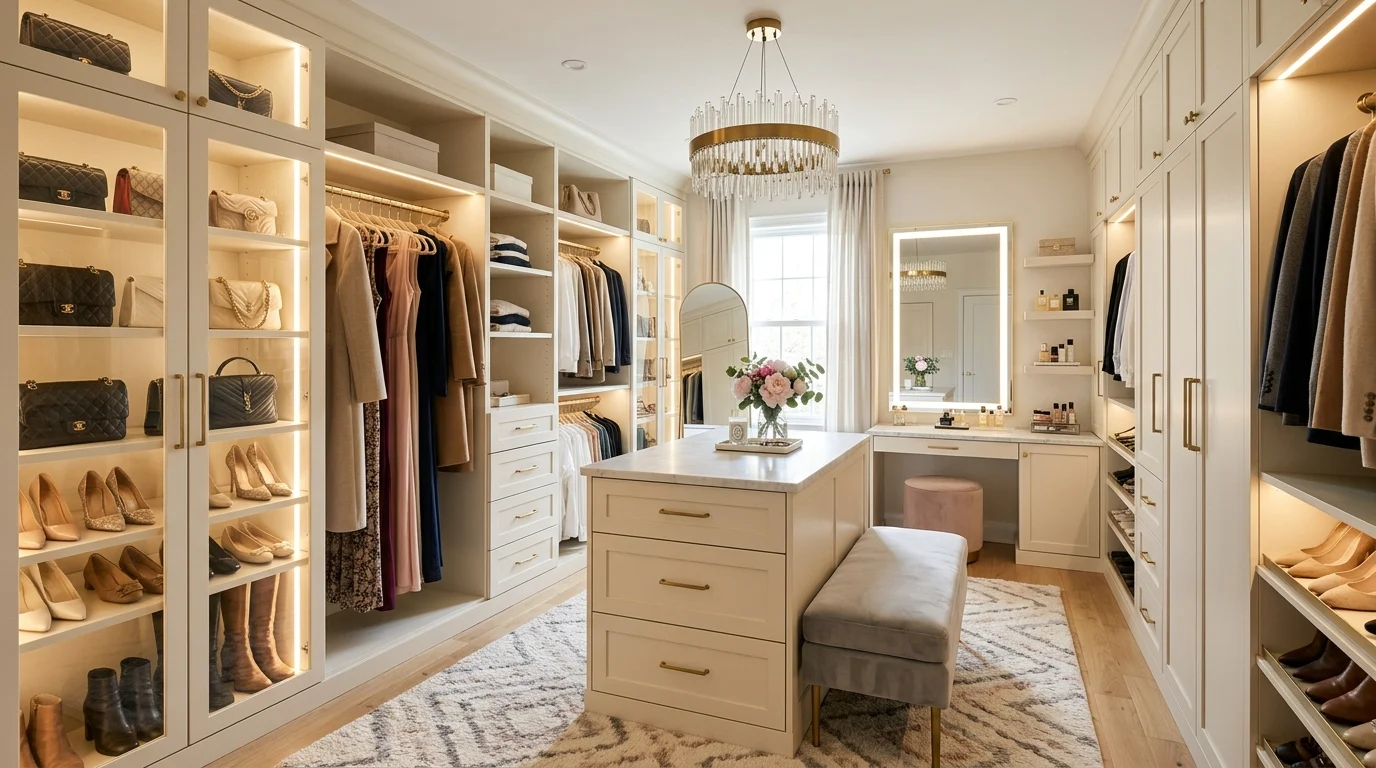
Glass-front cabinets transform clothing storage into a visual display, adding a boutique-like quality to a dressing room that closed, opaque cabinetry simply can’t replicate. A friend of mine incorporated this into her dressing room renovation, using glass-front cabinets to showcase a curated selection of handbags and shoes, essentially turning her most prized accessories into decor. This approach does require a certain level of ongoing organization, since everything displayed behind glass is visible at all times, but she’s found that the visibility actually encourages her to keep that section tidier than a closed cabinet ever did. I’d recommend reserving glass-front storage for your most photogenic or special-occasion items rather than everyday basics, since the visual impact works best when what’s on display feels curated and intentional rather than simply everything you own crammed behind glass without much thought given to arrangement or color coordination. She also mentioned that grouping items by color within the glass cabinets, rather than by type or frequency of use, made the biggest visual difference once everything was arranged, since a rainbow of mismatched colors behind glass reads as cluttered no matter how organized the underlying system might be. Taking the extra time to color-coordinate her displayed handbags and shoes turned what could have been a purely functional storage solution into something that genuinely looks like a small boutique display, which has become one of the first things visitors comment on when they see her dressing room for the first time.
4. Incorporate an Island for Folded Items and Extra Storage
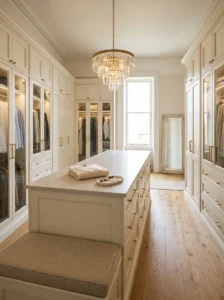
For larger dressing rooms, a central island, similar to what you’d find in a kitchen, provides both additional storage and a functional surface for folding, laying out outfits, or packing for a trip. We added a modest island with drawers on both sides to our dressing room, and it’s become one of the most-used features in the entire space, offering a flat surface that our previous cramped closet simply never had room for. The drawers underneath have proven incredibly useful for folded items like sweaters and undergarments that don’t need to be hung, freeing up more hanging rod space for dresses, blazers, and other items that wrinkle easily. If your room can’t accommodate a full island, even a smaller freestanding table or a narrow console positioned centrally can offer some of the same functional benefits on a reduced scale, giving you a dedicated flat surface without requiring the same amount of floor space a true island installation would demand. We also added a small padded top to one end of our island, giving us a spot to sit briefly while sorting through folded items or packing a suitcase, which turned out to be more useful than I initially expected when planning the piece. I’d suggest measuring your room’s clearance carefully before committing to an island size, leaving at least three feet of walking space on all sides, since a beautiful island that makes the room feel cramped or difficult to navigate ultimately works against the calm, functional atmosphere a good dressing room is meant to provide.
5. Choose a Statement Rug to Ground the Space
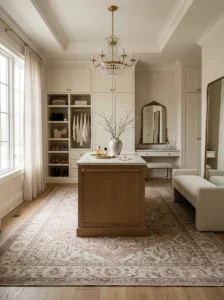
A dressing room floor often gets overlooked in the planning process, but a well-chosen rug adds warmth, softens the space underfoot, and can serve as a genuine design statement in its own right. I added a plush, patterned rug to the center of our dressing room, choosing something with enough visual interest to stand on its own given the relatively simple, neutral cabinetry surrounding it. Beyond the aesthetic value, the rug also makes a real practical difference each morning, since stepping onto something soft rather than bare hardwood while getting dressed is a small comfort that’s easy to underappreciate until you actually have it. I’d recommend choosing a rug in a material that’s relatively easy to clean, given that dressing rooms tend to see a fair amount of foot traffic and the occasional dropped makeup product or spilled perfume, since a rug that shows every mark will quickly start to look worn regardless of how beautiful the initial pattern or color choice was. We ultimately chose a low-pile wool blend specifically because it strikes a good balance between softness underfoot and practical stain resistance, having learned from an earlier, plusher rug in a different room that trapped debris and stained more easily than we would have liked. It’s also worth considering rug size carefully in a dressing room context, since a rug that’s too small can look like an afterthought floating in the middle of the floor, while one sized to extend beneath the island or vanity helps visually unify the whole space into one cohesive area.
6. Add a Comfortable Seating Area
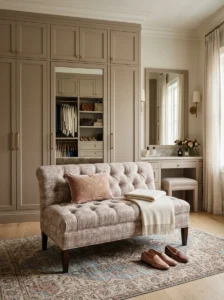
A small seating area, whether a single upholstered chair, a chaise, or a cushioned bench, transforms a purely functional dressing room into a space where you might actually want to linger. We added a small tufted bench at the foot of our vanity, giving us a spot to sit while putting on shoes or simply pause for a moment during the morning routine. A friend went a step further in her own larger dressing room, adding a small chaise lounge in the corner specifically for relaxing while deciding on an outfit for a special occasion, treating the whole process more like an event than a rushed daily task. Seating doesn’t need to be elaborate or expensive to make a genuine difference, even a simple stool tucked into an otherwise unused corner adds a sense of comfort and intentionality that an entirely stand-and-shop layout doesn’t provide, particularly for anyone who spends more than a few minutes each day getting ready. I’ve also noticed that having a seating option nearby makes trying on multiple outfit combinations feel far less tedious, since I can sit down to swap shoes or adjust an accessory rather than balancing awkwardly on one foot the way I used to in our old cramped closet setup. When choosing upholstery for any seating in this kind of space, I’d recommend a slightly darker or patterned fabric over a very light, easily stained option, since a dressing room chair or bench tends to encounter more incidental contact with makeup, hair products, and jewelry than furniture in most other rooms of the house.
7. Use a Bold Wallpaper or Accent Wall
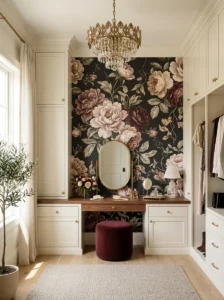
Since dressing rooms are typically smaller, more contained spaces, they’re an excellent place to experiment with a bold wallpaper or dramatic accent color that might feel overwhelming in a larger living space. We chose a rich floral wallpaper for one wall of our dressing room, balancing it against simpler, more neutral cabinetry and flooring throughout the rest of the space. The result feels genuinely luxurious without overwhelming the room, since the bold pattern is contained to a single wall rather than surrounding you on every side. This is also a relatively low-commitment way to experiment with a design choice you might hesitate to use elsewhere in the home, since a dressing room’s smaller footprint means less wallpaper is needed overall, reducing both the cost and the risk if your taste happens to shift a few years down the line and you decide to update the look. I’d also suggest considering how the wallpaper pattern interacts with the rest of the room’s finishes before committing, since a busy floral pattern paired with equally busy hardware or fixtures can quickly tip the room from bold and luxurious into visually overwhelming. In our case, we kept every other surface in the room deliberately simple, plain cabinetry, a solid-colored rug, understated hardware, specifically so the wallpaper could take center stage without competing for attention against too many other loud design choices happening simultaneously. This restraint elsewhere in the room has meant we’ve never felt the need to update the wallpaper out of visual fatigue, since it remains the singular bold statement rather than one competing element among several.
8. Add Full-Length Mirrors on Multiple Walls
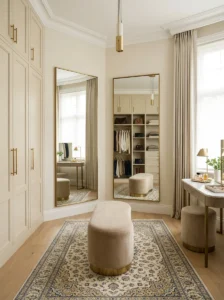
While a single mirror is functional, incorporating full-length mirrors on two adjacent or opposite walls allows you to see your full outfit from multiple angles, which is particularly useful for special occasions or simply for double-checking how an outfit looks from behind. We installed one full-length mirror on the back of our dressing room door and another mounted directly on the opposite wall, and being able to catch a three-dimensional view of an outfit before leaving the house has genuinely reduced those frustrating moments of discovering a wrinkle or an awkward fit only after arriving somewhere. Positioning mirrors to face each other, rather than adjacent walls, can create an interesting infinity effect that some homeowners love for the dramatic, almost boutique-fitting-room quality it adds, though it’s worth considering whether that specific effect suits your personal taste before committing to that particular mirror placement throughout the room. We ultimately chose the adjacent wall configuration rather than facing mirrors, since the infinity effect felt a bit disorienting during our trial period with a temporary mirror setup, and I’d genuinely recommend testing the arrangement with inexpensive removable mirrors before installing anything permanent, given how personal a reaction the reflective, repeating visual can be depending on individual preference. Beyond outfit checking, the multiple mirrors have also made the room feel noticeably brighter and more open overall, since they bounce whatever natural or artificial light is available around the space far more effectively than a single mirror ever could on its own.
9. Incorporate Under-Cabinet Lighting for Drawers and Shelving
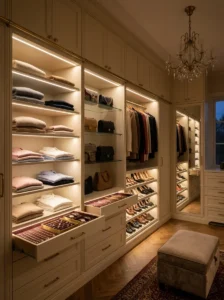
Beyond the main overhead and vanity lighting, adding small LED strips beneath shelving or along the interior of drawers ensures you can actually see items clearly, particularly in a room without abundant natural light. We added simple battery-operated LED strips beneath each shelf in our dressing room, and the difference in visibility, especially early in the morning before the sun is fully up, has been more significant than I expected from such a small, inexpensive addition. This kind of lighting also adds a subtle, boutique-like glow to the room even when the main lights are off, creating a soft ambient effect that makes the space feel considered and finished down to the smallest detail rather than purely functional and utilitarian in its lighting approach. Installing these strips turned out to be far simpler than I expected, since the battery-operated versions we chose required no wiring at all, just a bit of adhesive backing to attach them beneath each shelf edge, making this an accessible upgrade even for anyone hesitant to tackle any electrical work themselves. I’ve since added a few more strips inside deeper drawers as well, since those tend to be the spots where small items like jewelry or hair accessories are hardest to locate without proper lighting, and the small investment in additional strips has made a noticeably bigger difference than I anticipated for such an inexpensive addition to the overall renovation, one I’d recommend to anyone tackling a similar space on a modest budget.
10. Use Velvet or Upholstered Hangers for a Cohesive Look
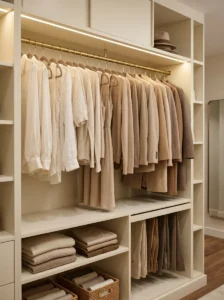
This might seem like a small, almost inconsequential detail, but switching to matching velvet hangers throughout a dressing room creates an immediate sense of cohesion and polish that mismatched wire or plastic hangers simply can’t achieve. I made this swap in our own dressing room, and the visual difference was more dramatic than I anticipated, everything hanging in the closet suddenly looked more like a curated boutique display than a random assortment of clothing accumulated over years. Beyond the aesthetic benefit, velvet hangers also tend to be gentler on delicate fabrics and prevent slipping better than smooth plastic or wire alternatives, meaning fewer items end up in a heap at the bottom of the closet after a hanger failed to hold them properly overnight. The thinner profile of velvet hangers compared to bulkier wooden ones also means the closet rod can actually hold more items in the same amount of space, which turned out to be an unexpected practical bonus alongside the visual improvement I was originally focused on. I’d recommend buying hangers in bulk sets specifically designed for closets, rather than purchasing a few packs here and there, since matching every single hanger exactly is what creates that cohesive, boutique-like effect, and even a handful of mismatched hangers scattered throughout can noticeably undercut the overall polish of the finished look, something I learned firsthand after initially mixing leftover hangers with the new set, which made the closet look half-finished until every single one was replaced.
11. Add a Jewelry Organization Wall or Display Case
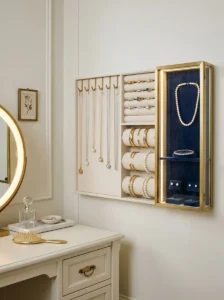
Dedicated jewelry storage, whether a wall-mounted organizer with hooks and small compartments or a glass display case, keeps accessories visible and accessible rather than tangled in a drawer. We added a simple wall-mounted jewelry organizer near our vanity, and being able to see everything at a glance each morning has genuinely sped up our getting-ready routine, since we’re no longer digging through a jewelry box trying to untangle necklaces before we can even start deciding what to wear. A friend with a larger dressing room budget opted for a small glass display case instead, treating her finer jewelry pieces almost like museum objects, which suits the more formal, boutique-inspired aesthetic she was going for throughout the rest of her dressing room’s design. She mentioned that lining the case with a soft velvet fabric, rather than leaving the interior plain, made her pieces look noticeably more elevated, almost like they belonged in an actual jewelry store display rather than simply stored at home. For those on a tighter budget, a simple wall-mounted organizer, like the one we chose, can be found relatively inexpensively and still delivers most of the same organizational and visual benefit, proving that this particular upgrade doesn’t necessarily require a significant financial investment to make a genuine difference in daily function, regardless of which route you ultimately choose for your own space and budget constraints, both options achieve the core goal of keeping accessories visible, organized, and genuinely enjoyable to use each morning.
12. Choose a Cohesive Color Palette Throughout
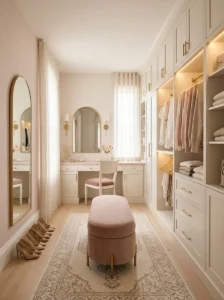
Just as with any other room, a dressing room benefits enormously from a cohesive color palette rather than a random assortment of finishes and tones competing with one another. We settled on a soft blush and warm gold palette throughout our space, carrying those tones through the wallpaper, hardware finishes, and even smaller accessories like trays and picture frames. This consistency has made the room feel considerably more polished and intentional than if we’d simply combined whatever finishes happened to be available or on sale during the renovation process. I’d recommend choosing your palette early in the planning process and referring back to it consistently as you make individual purchasing decisions, since it’s easy for a room to start feeling disjointed if each new piece is selected in isolation without considering how it fits into the broader color story you’re building throughout the space. We kept a small physical swatch board with our chosen paint chip, fabric sample, and hardware finish pinned together, bringing it along on every shopping trip so we could compare new potential purchases directly against our established palette rather than relying on memory alone. This simple habit prevented a couple of near-purchases that, in hindsight, would have clashed subtly with our existing color story, saving us both the expense and the hassle of returning items that didn’t actually work once brought home and viewed alongside everything else in the room, a small precaution that paid for itself many times over throughout the renovation.
13. Add a Built-In Shoe Display
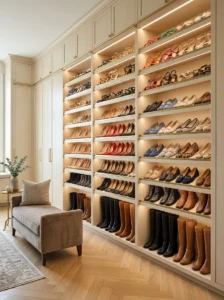
Rather than storing shoes in boxes or a jumbled pile at the bottom of the closet, a built-in shoe display, whether angled shelving or individual cubbies, turns footwear into part of the room’s visual design. We added angled shoe shelves along one wall of our dressing room, and beyond making our shoes considerably easier to find, the display has become a genuine design feature in its own right, almost like a small retail display within our home. This approach also makes it much easier to actually see everything you own, which has reduced the number of times I’ve purchased a near-duplicate pair of shoes simply because I’d forgotten I already owned something similar buried at the back of a closet. We angled each shelf slightly to allow shoes to lean forward and be seen fully rather than lying flat and stacked, which took a bit more construction planning than a standard flat shelf but made an enormous difference in how the display actually reads visually once installed. I’d suggest grouping shoes loosely by color or type across the display, sandals together, boots together, rather than in the order you happened to acquire them, since this small organizational choice makes the whole display feel more intentional and considerably easier to navigate on a busy morning when you’re trying to find a specific pair quickly, especially before the coffee has fully kicked in and quick decisions matter most, turning what used to be a small daily frustration into a genuinely smooth part of the morning.
14. Incorporate a Steamer Station or Small Laundry Nook
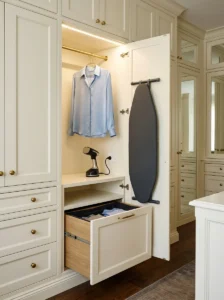
For those who want their dressing room to function as a genuine one-stop getting-ready hub, incorporating a small steamer station or a compact laundry nook keeps last-minute wrinkle removal and quick garment care contained to the same space where you’re already getting dressed. We added a small dedicated shelf and outlet specifically for our garment steamer, along with a small hamper tucked into a cabinet, which has meant I no longer need to run back and forth between the dressing room and a separate laundry area when a quick touch-up is needed before heading out the door. This is a smaller, more practical addition compared to some of the more visually dramatic ideas on this list, but the daily convenience it’s added has made it one of the most genuinely useful choices in the entire renovation. Before adding this dedicated station, our steamer lived in a hallway closet, which meant an extra trip whenever a last-minute wrinkle needed addressing before heading out the door, a small hassle that added up over time into a genuine daily frustration. Having everything, the steamer, an ironing board that folds flat against the wall, and the small hamper, all within the same room has streamlined our morning routine more than any single purely decorative choice we made throughout the rest of the space, proving that not every impactful upgrade needs to be visually dramatic to make a real difference in how smoothly each day actually starts.
15. Add a Small Perfume or Fragrance Display
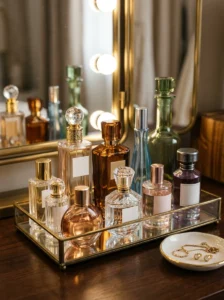
A curated tray or small shelf specifically for perfume bottles turns fragrance into another layer of the room’s visual design rather than tucking bottles away in a drawer where they’re easily forgotten. I added a small mirrored tray on our vanity specifically for a rotating selection of perfumes, and beyond the practical convenience of having them all visible and within reach, the bottles themselves have become an unexpected decorative element, catching light in a way that adds a subtle sparkle to that corner of the vanity throughout the day. This is a low-cost addition that works well regardless of your dressing room’s overall size or budget, since it simply requires a small tray and a bit of intentional arrangement rather than any structural changes to the room. I’ve found that grouping bottles by height, taller ones toward the back and shorter ones in front, keeps every label visible and easy to identify at a glance, which has genuinely sped up my morning routine compared to when the bottles were previously scattered across a drawer in no particular order. Rotating the display seasonally, keeping heavier, warmer scents out during colder months and lighter, fresher fragrances more visible in summer, has also become a small ritual that keeps the vanity feeling fresh and current throughout the year without requiring any real additional effort beyond a quick swap every few months, one of those small habits that adds up to a genuinely different feeling space over time.
16. Use Mixed Metal Finishes for Visual Interest
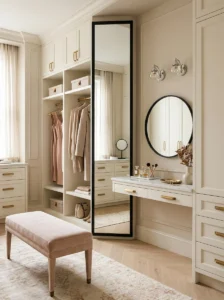
Rather than sticking to a single hardware finish throughout, thoughtfully mixing metals, brass drawer pulls alongside a chrome mirror frame, for instance, can add subtle visual interest and depth to a dressing room’s overall design. We incorporated brass hardware alongside a black-framed mirror and chrome vanity light fixtures, and rather than feeling mismatched, the variety has added a layered, collected quality to the room that a single uniform finish throughout might not have achieved. The key to making this work successfully is intentionality, choosing two or at most three finishes to repeat consistently throughout the room, rather than randomly mixing metals without any clear pattern, which can quickly start to look accidental or careless rather than deliberately curated. We settled on brass for drawer pulls and larger hardware, reserving chrome specifically for lighting fixtures, which gave the mixing a clear internal logic that’s easy for the eye to follow even without consciously registering why the combination works. I’d recommend picking one finish to serve as the dominant tone throughout the space, with the second and third finishes appearing more sparingly as accents, rather than giving each metal equal visual weight, since an even split between finishes tends to read as less cohesive than a clear primary and secondary hierarchy, a lesson that took a bit of trial and error for us to fully appreciate before finally landing on the right balance between the two chosen finishes, one that now feels effortless even though it took a few adjustments to get there.
17. Add Closed Storage for Everyday, Less Photogenic Items
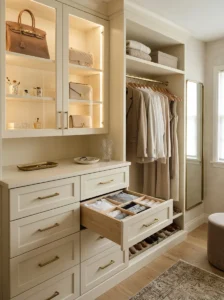
While open shelving and glass-front cabinets showcase your most beautiful pieces, every dressing room also needs closed storage for the everyday basics, undergarments, gym clothes, off-season items, that don’t necessarily need to be on display. We balanced our more decorative open storage with a bank of simple closed drawers along one wall, ensuring the room stays looking polished and curated even though plenty of less glamorous, purely functional items are stored just out of sight. This balance between open display and closed storage has been essential to maintaining the luxe feel of the space day to day, since a dressing room where absolutely everything is visible can quickly start to look cluttered and overwhelming rather than intentionally curated, regardless of how beautiful any individual item might be. We labeled the interior of each closed drawer, a small detail that’s made a real practical difference in how quickly we can locate specific items without needing to open several drawers before finding the right one. I’d also recommend leaving a bit of extra space within closed storage rather than filling every drawer to capacity, since items that are jammed in tightly become considerably harder to keep organized over time, undermining the very system you’ve worked to establish through the initial organization effort, especially once new items inevitably get added down the line and the drawers need a bit of breathing room to accommodate them, keeping the whole system functional rather than becoming a source of frustration over time.
18. Incorporate a Small Reading or Relaxation Corner
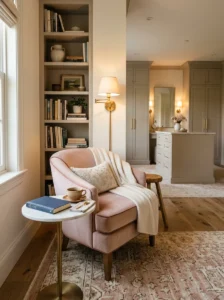
For those with enough square footage, dedicating a small corner of the dressing room to a comfortable chair and a side table, away from the main getting-ready area, creates a space for slower, more relaxed moments beyond the typical rushed morning routine. A friend added a small armchair and a compact bookshelf to an underused corner of her larger dressing room, and it’s become a genuine retreat where she reads or simply unwinds in the evenings, well beyond the room’s original purpose of just getting dressed. This kind of addition works best in more generously sized dressing rooms where the extra square footage isn’t needed for storage or the main getting-ready functions, since a cramped, over-programmed small space rarely benefits from trying to squeeze in an additional secondary use beyond its primary purpose. She specifically chose a small side table with a lamp for this corner rather than relying on the room’s main lighting, since the softer, more localized light better suited the relaxed, unhurried mood she wanted for that particular part of the space. This kind of secondary zone has also proven useful beyond reading, serving as a quiet spot to make phone calls or simply step away for a few minutes without leaving the room entirely, adding a layer of everyday functionality beyond what the dressing room’s original purpose alone would have provided, and something she says she genuinely didn’t anticipate needing until it was already there, proving how a single small design choice can end up serving several unexpected purposes over time.
19. Use Layered Lighting for Different Times of Day
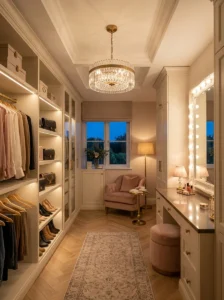
Beyond the statement chandelier and vanity lighting already mentioned, incorporating a few additional layered lighting sources, a floor lamp, small accent lights within cabinetry, ensures the room can adapt to different needs throughout the day rather than relying on a single lighting setup for every situation. We added a small floor lamp in the seating corner of our dressing room specifically for evenings when we want softer, more ambient lighting rather than the brighter, more functional illumination needed for actually selecting an outfit or applying makeup each morning. This layered approach has made the room feel considerably more versatile, functioning equally well as a bright, practical getting-ready space in the morning and a calmer, more relaxed retreat in the evening, adapting to whatever the moment actually calls for rather than remaining static throughout the entire day. I’d recommend mapping out how you actually use the room at different times before finalizing a lighting plan, since our own routine, bright and efficient in the morning, slower and more relaxed at night, revealed exactly which additional light sources would genuinely get used versus which ones might just look nice without serving a real daily function. Installing separate switches for each lighting layer, rather than one single switch controlling everything at once, has also given us far more flexibility, letting us light only the vanity during a quick morning routine or bring the whole room to life with every source active when getting ready for a special occasion.
20. Personalize the Space With Art and Meaningful Objects
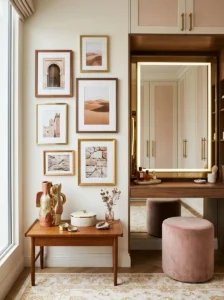
Finally, incorporating a few pieces of art, family photos, or meaningful personal objects prevents a dressing room from feeling like a generic showroom display and instead makes it feel like a genuine reflection of the person using it daily. We added a small gallery of travel photos on one wall and a piece of art gifted by a family member near the vanity, and these personal touches have made the room feel distinctly ours rather than simply a beautifully designed but somewhat impersonal space. This final layer of personalization is often the detail that ties everything else together, transforming a well-executed design plan into a room that genuinely feels like a personal, meaningful retreat rather than a showroom that happens to be inside your own home. I’d recommend choosing personal items thoughtfully rather than simply filling every remaining empty surface, since restraint matters here just as much as it does with the room’s storage and styling choices, a handful of genuinely meaningful pieces will always read as more intentional than a larger collection assembled without much consideration. Looking around our finished dressing room now, it’s these smaller personal touches, more than any single expensive furniture piece or fixture, that consistently make the space feel like it belongs specifically to us rather than a design plan that could have been installed in anyone else’s home just as easily, which is ultimately the quality that makes a room feel truly finished rather than simply well decorated according to whatever trend happened to be popular at the time of the renovation.
Mistakes I Made Along the Way
- Underestimating how much lighting mattered before adding the vanity setup – Our early plan relied entirely on the overhead chandelier, which created harsh shadows until we added dedicated vanity lighting.
- Choosing a rug that showed marks too easily – My first rug choice looked beautiful in the showroom but showed every dropped makeup product almost immediately.
- Overcrowding open shelving before adding closed storage – Everything looked cluttered until we balanced the open display areas with proper closed drawers for everyday items.
- Mixing too many metal finishes without a clear plan – My first attempt at mixing metals felt random rather than intentional until I narrowed things down to just two or three consistent finishes.
Frequently Asked Questions
How much space do I need for a dedicated dressing room? While larger rooms offer more flexibility for features like an island or seating area, even a small converted closet or spare room of 60 to 80 square feet can function beautifully with the right layout and storage choices.
What’s the most important feature to prioritize on a budget? Good lighting, particularly a well-lit mirror or vanity area, tends to offer the most noticeable improvement to daily function and overall luxury feel for the lowest relative cost compared to larger structural changes.
Should a dressing room match the bedroom’s design style? It’s not strictly necessary, and many homeowners actually enjoy using a dressing room as a space to experiment with bolder colors or patterns that might feel too intense in a bedroom meant primarily for rest.
Can I create a luxe dressing room in a small space? Yes, thoughtful choices like a statement light fixture, a well-lit mirror, and a cohesive color palette can create a genuinely luxurious feel even in a modest-sized room, without requiring extensive square footage.
Final Thoughts
Looking back at that cramped closet corner we started with, it’s genuinely satisfying to see how much a dedicated, thoughtfully designed dressing room has changed our daily routine. A luxe getting-ready space doesn’t require an enormous room or an unlimited budget, sometimes it just takes the right combination of lighting, storage, and a few personal touches to transform an ordinary daily task into something that actually feels special.