A few years ago, my nephew asked me to help him redesign his bedroom into a “proper gaming setup.” I honestly thought it would take a weekend and a new desk. Three months, two returned chairs, one electrician visit, and a lot of cable management later, I realized just how deep this rabbit hole goes. What started as “just add a better monitor” turned into learning about ambient lighting, ergonomic seating, acoustic panels, and even how airflow in a room affects long gaming sessions.
Since then, I’ve helped set up a handful of gaming rooms for friends and family, and I’ve picked up a lot of practical, real-world lessons along the way — the kind you only learn by actually living in the space, not just looking at photos online. In this guide, I’m walking you through 21 gamer bedroom setups that go beyond the typical “add RGB lights and call it done” advice. Some are budget-friendly, some are more ambitious, but all of them are things I’ve either built myself, helped someone else build, or researched thoroughly enough to trust.
1. The Minimalist Battle Station
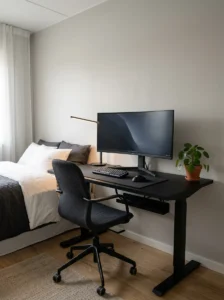
When my nephew first showed me inspiration photos, almost everything was cluttered with wires, extra monitors, and shelves stacked with collectibles. We went the opposite direction and built what I now call the “minimalist battle station.” The idea is simple: one clean desk, a single ultrawide monitor instead of three separate screens, and absolutely no visible cables. We ran every cord through the desk’s built-in cable channel and mounted a power strip underneath using a small tray.
What surprised me most was how much this improved focus during actual gameplay. There’s something about a clutter-free desk that keeps your mind from wandering. We paired it with a matte black desk, a single desk lamp with adjustable warmth, and just one small plant for a touch of life in the room. No posters, no extra decorations — just clean lines and functional gear.
If you’re going for this look, invest in cable management accessories early. Under-desk trays, adhesive clips, and a cable sleeve for your main power/data bundle make a bigger difference than any decorative item you could add. This setup works especially well in smaller bedrooms where visual clutter makes the room feel even more cramped than it already is.
2. Dual Monitor Command Center
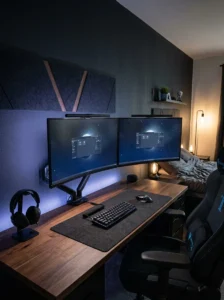
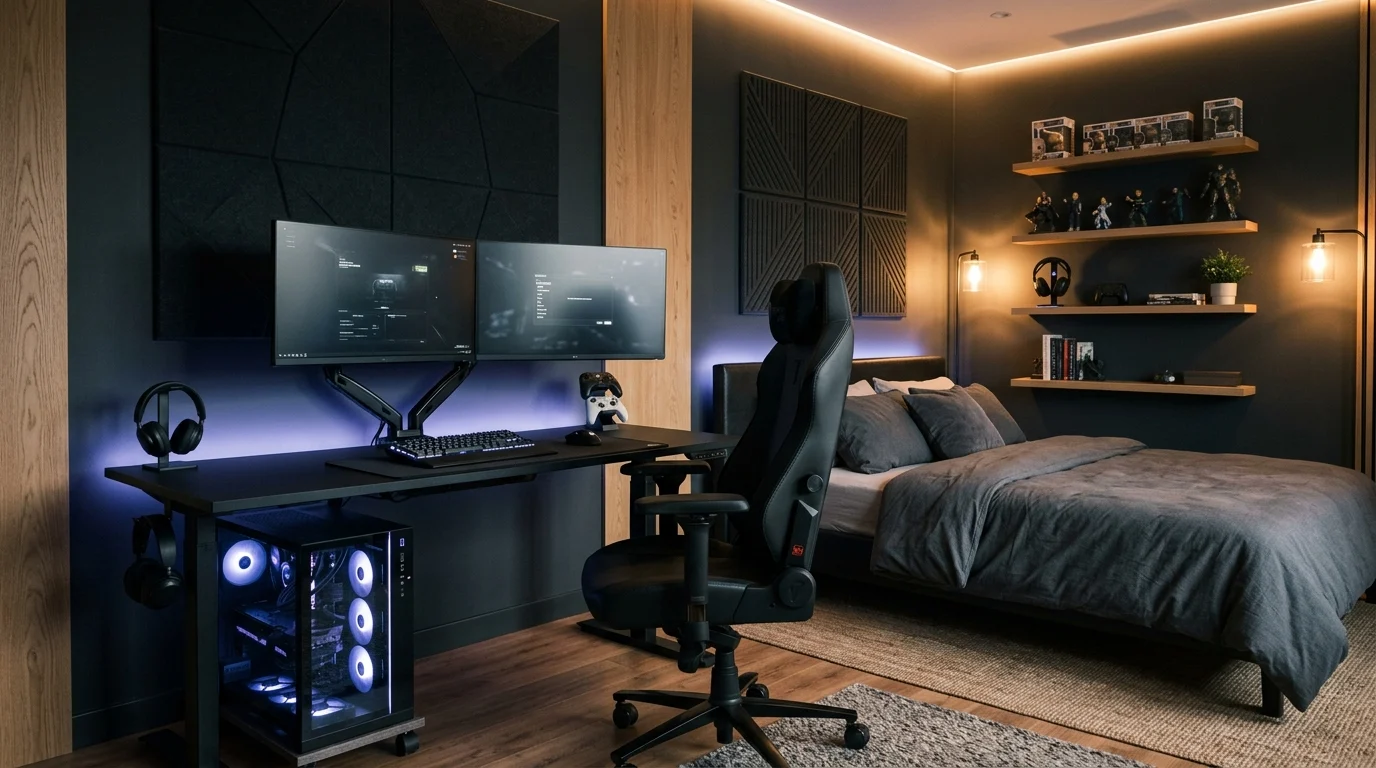
For anyone who streams, multitasks, or just likes having a Discord call open while gaming, a dual monitor setup is still one of the most practical choices out there. When I built this for a friend who streams part-time, we mounted both monitors on a single dual-arm stand rather than using separate stands, which instantly freed up desk space for a mouse pad, keyboard, and drink coaster.
The key lesson here was monitor height. Both screens need to sit at eye level, with the top of the monitor roughly in line with your eyes when sitting upright. We initially had them slightly too high, and after a few gaming sessions, my friend mentioned neck strain — a quick adjustment on the arm mount fixed it immediately.
We angled the secondary monitor slightly inward, about 15 degrees, so it felt like a natural extension of the main screen rather than a separate, awkward panel. This is a small detail, but it makes switching your gaze between screens feel much more natural during fast-paced gameplay.
For lighting, we added a bias light behind the monitors — a soft LED strip that reduces eye strain by softening the contrast between the bright screen and a dark room. This is genuinely one of the most underrated additions in any gaming setup, and it made a noticeable difference during late-night sessions.
3. Console Corner with a Big Screen
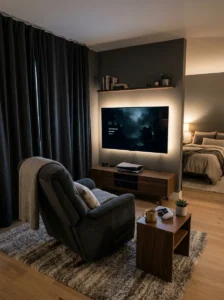
Not every gamer wants a desk-based PC setup, and honestly, some of the coziest gaming spaces I’ve seen are console-focused corners built around comfort rather than desks. My cousin’s bedroom has this exact setup: a wall-mounted TV, a reclining gaming chair (not the typical racing-style chair, but an actual recliner), and a small side table for snacks and controllers.
What makes this layout work is the seating distance. For a 55-inch TV, you generally want to sit around 7 to 9 feet away for comfortable viewing without excessive head movement. We measured his room and adjusted the chair position accordingly, which made a bigger difference than I expected — sitting too close made fast-paced games feel overwhelming and harder to track.
We also added blackout curtains, which honestly transformed the room. Console gaming on a big screen benefits enormously from reduced glare, and the difference between daytime and nighttime visibility with the curtains closed was night and day (pun intended).
For storage, we used a low media console with hidden compartments for controllers, charging cables, and extra HDMI accessories, keeping the space looking tidy despite having multiple consoles connected. This setup proves you don’t need a desk-centric room to build something that feels genuinely “epic” — sometimes comfort-first design wins.
4. RGB-Themed Immersive Room
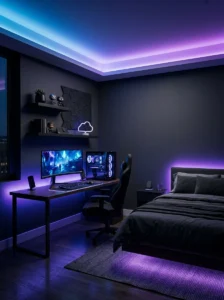
I’ll admit, I was skeptical about heavy RGB lighting at first — it felt gimmicky to me. But after helping set up a full RGB-themed room for a younger cousin, I understood the appeal. Done right, ambient RGB lighting genuinely changes the mood of a room and syncs surprisingly well with in-game action if you use software-linked lighting systems.
We used addressable LED strips along the ceiling perimeter, behind the desk, and along the bed frame, all connected through a single hub so colors could be synced together instead of looking mismatched. The biggest mistake beginners make is using too many separate, uncoordinated lighting products — we made sure everything used the same ecosystem so it could be controlled from one app.
For color choice, cooler tones (blues, purples) worked better for a calm late-night gaming vibe, while switching to warmer tones during the day made the room feel less overwhelming when natural light was already present. We set up a simple daytime/nighttime lighting scene using the app’s scheduling feature, which removed the need to manually adjust it every day.
One practical tip: keep the RGB strips slightly recessed or hidden behind trim wherever possible. Visible LED strips can look messy in daylight, but hidden strips create a soft glow effect that looks intentional and polished rather than like a string of Christmas lights.
5. Compact Setup for Small Bedrooms
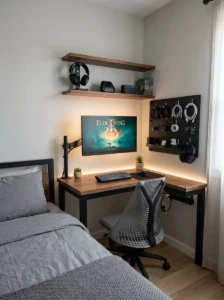
Not everyone has a spare room to dedicate to gaming, and honestly, some of the most creative setups I’ve seen come from working within serious space constraints. A friend of mine lives in a small studio apartment, and we built her entire gaming corner into roughly a 4×4 foot space using a corner desk.
Corner desks are genuinely underrated for small rooms. They use the “dead” corner space that usually goes to waste and free up the rest of the room for a bed, storage, or walking space. We paired hers with a wall-mounted monitor arm instead of a monitor stand, which reclaimed several inches of usable desk depth.
Vertical storage became essential here — floating shelves above the desk held her headset, controllers, and a small speaker, while a pegboard on the side wall held cables and small accessories off the desk surface entirely. This kept the compact footprint from feeling cluttered despite having a full gaming setup packed into a tiny area.
We also chose a compact chair without armrests, since full-sized gaming chairs with wide armrests simply didn’t fit the tight space without blocking the walking path. It’s a good reminder that “epic” doesn’t have to mean big — sometimes the most impressive setups are the ones that make the most of limited square footage.
6. The Streamer-Ready Setup
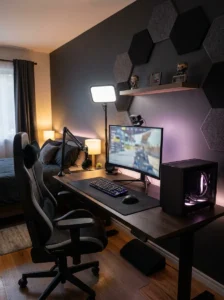
Setting up a bedroom for streaming adds a whole different layer of planning beyond just gaming comfort. When I helped a friend prep her room for regular Twitch streams, lighting and background became just as important as the actual gaming gear.
We positioned her desk facing a wall rather than a window, since natural light constantly shifting throughout the day was messing with her stream’s exposure settings. Behind her, we set up a simple backdrop: a dark accent wall with a single shelf holding a few curated items (not clutter) that looked good on camera without distracting viewers.
A key-light softbox was placed slightly above and in front of her camera position, angled to reduce harsh shadows on her face. This made a massive difference in video quality compared to relying on the room’s overhead lighting alone.
For audio, we added a simple acoustic panel behind her desk to reduce echo, since her bedroom had hard walls and minimal furniture, which was making her voice sound hollow on stream. It’s a detail most people overlook, but sound quality genuinely impacts viewer retention.
Cable management was also critical here since a messy background on camera looks unprofessional. We ran everything through a single cable channel and used a boom arm for her microphone to keep the desk surface completely clear.
7. Cozy Gamer Nook with Bean Bag Seating
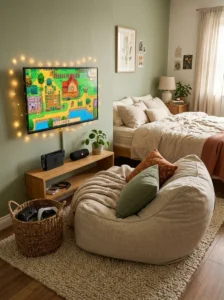
Not every gaming setup needs to be desk or console-centric. My youngest cousin’s favorite spot in her room is a small bean bag nook positioned near a low shelf holding a Nintendo Switch dock and a small portable speaker. It’s proof that “epic” setups can be genuinely simple.
We positioned the bean bag at a comfortable distance from a wall-mounted 32-inch monitor, low enough that sitting on the bean bag put her eyes at a natural, relaxed viewing angle. A soft area rug beneath the setup added comfort and helped define the space as its own little zone within the larger bedroom.
String lights along the wall behind the monitor added ambient lighting without the complexity of a full RGB system, which was perfect for someone who wanted a cozy vibe rather than an intense, competitive-gaming aesthetic.
We kept a small basket nearby for extra controllers and charging cables, since low-seating setups like this tend to accumulate loose items on the floor if there’s no designated storage. This little addition kept the space looking tidy without needing furniture that would clash with the relaxed, casual feel of the nook.
This type of setup is ideal for younger gamers, casual players, or anyone who wants a comfortable secondary gaming spot separate from a more serious desk setup elsewhere in the home.
8. The Dual-Purpose Study and Gaming Desk
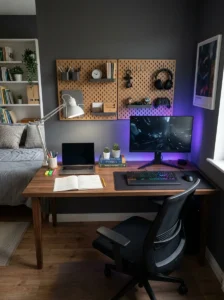
For students or anyone who needs their bedroom to serve double duty, combining a study space with a gaming setup is often necessary. When I helped my nephew balance schoolwork and gaming in the same room, the solution was a single large desk divided mentally (not physically) into two zones.
One side held his monitor, keyboard, and gaming mouse, while the other side stayed clear for textbooks and a laptop. We used a desk with enough width — around 55 inches — to comfortably fit both zones without feeling cramped when switching between homework and gaming.
Lighting played a big role in making this dual-purpose space work well. We used a brighter, cooler-toned desk lamp for study sessions and switched to the room’s ambient RGB lighting during gaming time, which created a psychological separation between “work mode” and “play mode” even though it was the same physical desk.
We also made sure his desk chair was ergonomically supportive enough for both long study sessions and gaming marathons, since a chair built purely for gaming aesthetics isn’t always great for posture during hours of studying.
A pegboard above the desk held stationery on one side and cable organizers/headset hooks on the other, keeping both “modes” visually distinct despite sharing the same surface. This setup is a smart, practical solution for anyone without the luxury of a separate gaming room.
9. Wall-Mounted Everything Setup
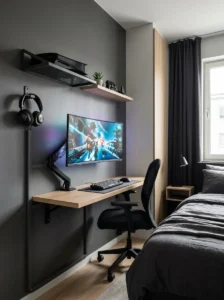
Floor space is often the biggest limitation in smaller bedrooms, so one of the most effective setups I’ve helped build relies almost entirely on wall-mounted gear. A friend’s apartment bedroom used a wall-mounted monitor arm, a wall-mounted headset hook, and even a wall-mounted small shelf for his console, leaving the actual desk surface almost entirely clear.
This approach genuinely maximizes usable space. With the monitor off the desk, there was room for a full keyboard, mouse, and even a notebook without feeling cramped. We used a monitor arm rated for the specific screen weight (always check this before buying, since cheap arms can sag over time) and mounted it into wall studs rather than drywall alone for stability.
Cable routing became especially important here since wall-mounted gear tends to create longer cable runs. We used adhesive cable channels along the wall, painted to match the wall color, which made the cables nearly invisible from a few feet away.
For a console setup mounted this way, ventilation matters — we left a few inches of clearance around the console shelf to avoid overheating, since wall-mounted shelves can sometimes reduce airflow compared to open floor placement.
This setup is ideal for renters or anyone in a small space who wants a serious gaming setup without sacrificing floor space for a bed, storage, or walking room.
10. The Themed Fandom Room
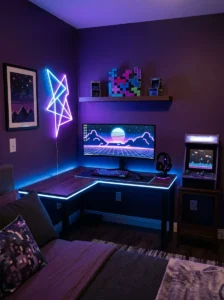
Some of the most memorable gaming rooms I’ve seen lean fully into a specific theme rather than trying to be a generic “gamer aesthetic.” My nephew’s friend built his entire room around a retro arcade theme, complete with a small arcade cabinet in the corner, neon-style signage, and a color palette of deep purples and electric blues throughout the room.
The key to making a themed room feel intentional rather than chaotic is picking 2-3 colors and sticking to them consistently across lighting, decor, and even bedding. In his case, purple and blue LED strips matched his bedspread and desk chair, creating a cohesive look rather than a random mix of gaming merchandise.
We kept decorative items curated rather than overwhelming — a few carefully chosen posters and a single shelf displaying collectibles, rather than covering every wall with merchandise. This restraint actually made the room feel more like an intentional design choice and less like a cluttered fan shrine.
Furniture choices mattered too. We found a desk with a subtle geometric pattern that fit the retro-arcade aesthetic without being overly literal or costume-like. Small details, like custom keycaps matching the color scheme or a themed mouse pad, tied the whole room together without requiring a complete furniture overhaul.
Themed rooms work best when you resist the urge to add everything at once — start with lighting and color palette, then slowly build in themed accessories over time as you find pieces that genuinely fit.
11. Ergonomic-First Setup for Long Sessions
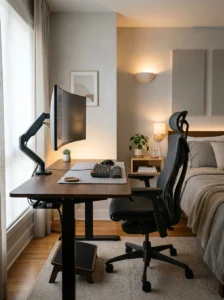
After watching a friend deal with wrist and back pain from years of poorly planned gaming setups, I became somewhat obsessed with ergonomics when helping others build their rooms. This setup prioritizes physical comfort above aesthetics, though it still looks genuinely great.
We started with an adjustable-height desk, allowing him to switch between sitting and standing throughout long sessions. This alone made a noticeable difference in his energy levels during extended gaming marathons. The chair was chosen based on lumbar support and adjustable armrests rather than flashy design, since proper support during 3-4 hour sessions matters more than how “cool” a chair looks.
Monitor height and distance followed ergonomic guidelines closely: top of the screen at eye level, roughly an arm’s length away. We also added a footrest, which surprisingly made a big difference in reducing lower back strain during longer sessions.
Keyboard and mouse placement mattered too — we used a wrist rest and positioned the keyboard so his elbows stayed at roughly 90 degrees while typing or gaming, avoiding the wrist strain that comes from reaching too far forward.
Lighting was set up to reduce eye strain specifically, with a bias light behind the monitor and warm, indirect lighting elsewhere in the room rather than harsh overhead lights. For anyone who games for genuinely long stretches, this ergonomics-first approach pays off in comfort far more than any aesthetic upgrade would.
12. Multi-Monitor Simulation Rig
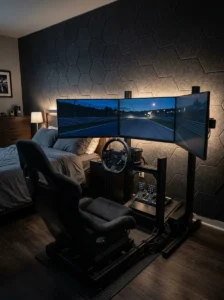
For racing and flight simulation enthusiasts, a triple-monitor curved setup creates an immersive field of view that single-screen setups simply can’t match. I helped a family friend build this exact setup, and the difference in immersion was honestly startling the first time we tested it.
We used a triple-monitor stand designed specifically to angle the two side monitors inward, creating a wraparound effect that mimics peripheral vision in racing games. Getting the bezel alignment and angle correct took some trial and error — even a few degrees off made the transition between screens feel jarring rather than seamless.
A racing wheel and pedal set was mounted on a dedicated stand rather than the desk itself, since the vibration and force feedback from intense racing sessions was actually shaking his desk setup before we made the switch. This small change dramatically improved stability during gameplay.
Seating was another important factor — we used a racing-style seat rather than a standard desk chair, positioned at a slightly reclined angle that matched the ergonomics of an actual car seat. This made the whole experience feel more authentic and comfortable during longer simulation sessions.
Cable management for this setup was more complex than usual given the number of peripherals involved, so we used a dedicated cable management box beneath the desk to keep everything organized and prevent interference with the wheel’s movement.
13. Budget-Friendly Starter Setup
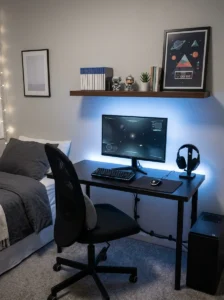
Not everyone wants (or needs) to spend a fortune on a gaming room, and one of the most rewarding projects I’ve worked on was helping a teenager build a genuinely great setup on a tight budget. We focused spending on the items that actually impact gameplay and comfort, while cutting costs on purely decorative elements.
The desk and chair came from a budget furniture store, but we made sure the chair at least had basic lumbar support even if it lacked premium materials. For lighting, instead of an expensive smart RGB system, we used affordable LED strip lights with a simple remote control, which still created a great ambient effect for a fraction of the cost.
We prioritized a decent monitor over extra accessories, since screen quality has a bigger impact on the actual gaming experience than most decorative items. A single well-chosen monitor beat out the idea of multiple cheap ones.
For decor, we used inexpensive poster prints and a secondhand shelf for displaying a small collection of games, keeping the personality of the room intact without a big budget. Cable management was handled with basic zip ties and adhesive clips rather than premium cable trays, proving that a tidy look doesn’t require expensive accessories.
This setup is proof that an “epic” gaming room isn’t about how much you spend — it’s about prioritizing the few elements that genuinely matter and being resourceful with the rest.
14. Dark Academia Meets Gaming Room
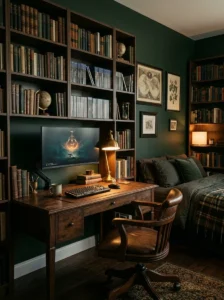
One of the more unexpected but genuinely beautiful setups I’ve seen blended a “dark academia” aesthetic with a functional gaming space. A friend’s sister wanted her room to feel sophisticated and cozy rather than the typical high-contrast gamer look, so we built around deep wood tones, warm brass accents, and soft amber lighting instead of RGB.
Her desk was a vintage-style wooden writing desk rather than a typical gaming desk, paired with a modern monitor arm that kept the aesthetic intact while still being functional. The contrast between the classic furniture style and the modern tech actually looked more intentional than mismatched, once we got the color balance right.
Lighting avoided cool blues and purples entirely, sticking to warm amber and soft white tones through a combination of a desk lamp and indirect ceiling lighting. This created a completely different mood compared to typical “gamer” rooms — calm and focused rather than high-energy.
Bookshelves surrounding the desk area doubled as both decor and storage, holding a mix of actual books and a curated selection of game cases, which tied the academic aesthetic together with her gaming hobby seamlessly.
This setup proves that gaming rooms don’t need to follow the typical neon-and-black color scheme — a well-thought-out alternative aesthetic can look just as intentional and even more unique.
15. Two-Player Co-Op Setup
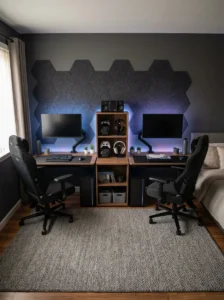
Designing a room for two gamers to play together comfortably requires different planning than a solo setup. When helping a sibling pair share a gaming space, we built a symmetrical dual-desk layout with mirrored monitor positioning so neither player felt like they had the “better” spot.
We used identical chairs, desks, and monitor arms on each side, positioned with enough space between them (about 3 feet) to avoid feeling cramped during co-op sessions while still being close enough for easy conversation and coordination during gameplay.
Shared elements, like a central speaker system and synced ambient lighting, helped the room feel cohesive rather than like two separate setups pushed together. We used a single lighting system controlled from either side, so both players could adjust the room’s mood together.
Storage was designed to be shared but organized — a central shelf unit between the desks held controllers, headsets, and accessories for both players, reducing clutter on either individual desk.
Acoustic considerations mattered more here than in solo setups since two people gaming simultaneously means double the noise. We added a small rug and a fabric wall hanging to soften some of the echo in the shared space, which made voice chat and general communication noticeably clearer.
16. Minimal Console-Only Bedroom
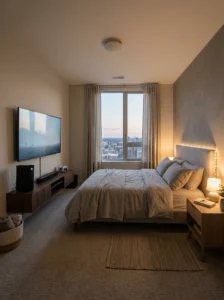
For gamers who prefer simplicity, a console-only setup without a dedicated desk can feel more like a relaxing bedroom than a workstation. My cousin’s partner built exactly this kind of room, centered around a comfortable bed positioned to face a wall-mounted TV, with minimal additional furniture.
We mounted the TV at a height appropriate for viewing from bed — generally with the center of the screen roughly at eye level when sitting up against the headboard, adjusted slightly based on bed height and TV size. This avoided the neck strain that comes from mounting a TV too high, which is a common mistake in bedroom setups.
A slim media console beneath the TV held the console and a small soundbar, chosen specifically because it didn’t take up much floor space in the otherwise minimal room. We avoided any desk or chair entirely, keeping the room feeling like a genuine bedroom rather than a workstation.
Lighting stayed simple — a single dimmable lamp and soft string lights along the headboard, creating a relaxed atmosphere suited to casual, comfortable gaming sessions rather than competitive, desk-based play.
This setup is ideal for anyone who games primarily for relaxation rather than competition, and who wants their bedroom to still feel like a bedroom first and a gaming space second.
17. Smart Home Integrated Gaming Room
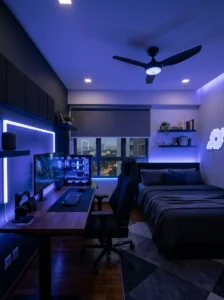
Integrating smart home technology into a gaming setup adds a layer of convenience that’s easy to underestimate until you’ve actually used it. When I helped set up a smart-enabled gaming room for a tech-savvy friend, voice-controlled lighting and smart plugs made daily use noticeably smoother.
We connected the RGB lighting system, a smart plug for the monitor and speakers, and even the room’s ceiling fan to a single smart home hub, allowing everything to be controlled through voice commands or a simple app. This meant he could say a single phrase to switch the entire room into “gaming mode,” dimming the lights, turning on his monitor’s power strip, and adjusting the fan speed simultaneously.
We also set up scheduled routines — lighting that automatically shifted to a calmer tone late at night, and a smart plug that fully powered down accessories when not in use to save energy and reduce standby power draw from multiple devices.
Smart blinds were another addition that made a bigger difference than expected, allowing him to adjust natural light levels without leaving his desk, which was particularly useful for reducing glare during daytime gaming sessions.
The main lesson from this setup was starting with a single connected ecosystem rather than mixing multiple incompatible smart home brands, which avoided the frustration of juggling several separate apps just to control one room.
18. Vertical Gaming Tower for Tiny Rooms
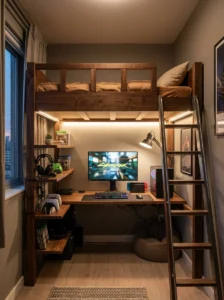
For extremely limited bedroom space, building vertically rather than horizontally can unlock surprising amounts of function. We helped a college student living in a small dorm-like room build what became essentially a vertical gaming tower — a loft-style bed with a desk built directly underneath it.
This design freed up the entire floor footprint that would normally be taken by a separate bed and desk, effectively doubling his usable floor space. The desk beneath the loft bed held his monitor, keyboard, and console, while the raised bed above created a naturally cozy, enclosed feeling to the workspace below.
Lighting required some extra thought since the loft bed blocked some natural light from directly above the desk. We added a clip-on desk lamp and a small LED strip along the underside of the bed frame, which solved the lighting issue while adding a nice ambient glow beneath the loft.
Storage was built directly into the loft bed’s support structure — small shelves attached to the vertical posts held games, headsets, and small accessories without needing separate furniture that the tiny room simply couldn’t accommodate.
This setup is a great example of thinking beyond the standard “desk against a wall” mentality when floor space is at an absolute premium — sometimes the solution is to build upward instead of trying to squeeze more furniture across the floor.
19. Nature-Inspired Calm Gaming Room
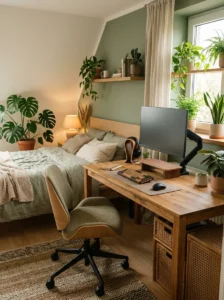
Not every gamer wants an intense, neon-lit aesthetic. A friend who games primarily for relaxation after work wanted her room to feel calming rather than stimulating, so we built her setup around natural materials, greenery, and soft, earthy tones instead of typical gamer lighting.
We used a wooden desk with visible grain texture, paired with woven storage baskets instead of plastic organizers, and added several real plants around the room, including a larger one positioned near the desk for a calming visual anchor during gaming sessions. Natural light played a bigger role here than in most gaming setups, with sheer curtains allowing soft daylight in rather than blocking it out entirely with blackout curtains.
Lighting in the evening used warm, low-intensity bulbs rather than any RGB or blue-toned lighting, maintaining the calm atmosphere even during nighttime gaming sessions. We avoided harsh contrast entirely, keeping the whole room in a consistent, soothing tonal range.
Her chair was chosen more for comfort and natural material aesthetics (a woven, ergonomic design) than typical “gaming chair” branding, which fit the room’s overall calm, grounded feel far better than a typical racing-style chair would have.
This setup is proof that a genuinely “epic” gaming room doesn’t need to look aggressive or high-energy — sometimes the most impressive setups are the ones tailored precisely to how someone actually wants to feel while playing.
20. Fully Modular Adjustable Setup
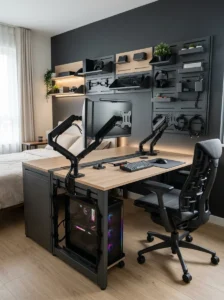
For gamers who like to frequently rearrange or upgrade their setup, building around modular, adjustable furniture makes long-term changes far easier. A tech-enthusiast friend of mine built his entire room around modular desk components, allowing him to reconfigure the layout every few months without buying entirely new furniture.
We used a modular desk system with interchangeable panels, allowing him to expand the desk width when he added a third monitor later, without needing to replace the entire piece. Monitor arms, rather than fixed stands, made repositioning screens simple whenever he changed his overall layout.
Shelving followed the same modular philosophy — wall-mounted shelf units that could be added, removed, or repositioned based on his current storage needs, rather than a fixed bookshelf that would eventually feel outdated or restrictive.
Cable management in a modular setup required more planning upfront, since cables needed enough slack to accommodate future rearrangement without needing to be completely redone each time. We used longer cables with velcro ties rather than fixed-length cable channels, allowing flexibility for future changes.
This setup is ideal for gamers who enjoy tinkering with their space regularly and want the flexibility to upgrade or reorganize without a full room overhaul every time their needs or preferences change.
21. The Ultimate All-In-One Dream Setup
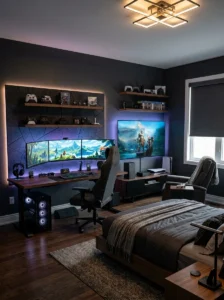
Finally, for those with the budget and space to go all-out, combining the best elements from several setups above creates what I’d genuinely call a dream gaming room. When I helped design this type of room for a client who wanted “everything,” we combined an ergonomic adjustable desk, a triple-monitor curved display, full smart-home RGB integration, acoustic paneling, and a dedicated console corner with a separate recliner.
The key challenge with an all-in-one setup like this is avoiding visual and functional chaos. We zoned the room carefully — the desk and monitor setup occupied one wall, the console and recliner area occupied another, and a shared ambient lighting system tied both zones together without making either area feel disconnected from the room’s overall theme.
Acoustic panels were added strategically behind the desk and near the console area to manage sound quality for both gaming audio and any potential streaming setup, while smart plugs and voice control tied every element together into a single, cohesive “gaming mode” that could transform the whole room’s atmosphere instantly.
Storage was distributed throughout the room rather than concentrated in one spot, with dedicated shelving near each zone to keep controllers, cables, and accessories organized based on where they were actually used.
This setup represents the culmination of everything I’ve learned from smaller projects over the years — proof that with careful planning, it’s entirely possible to build a genuinely epic, fully functional gaming bedroom without it feeling cluttered or disjointed, even when combining multiple advanced features into a single space.
Frequently Asked Questions
What is the most important element of a gamer bedroom setup? Based on my own experience, lighting and cable management have the biggest impact on how “put together” a room feels, even more than the specific furniture or tech you choose.
How much does a good gaming bedroom setup cost? It varies enormously — a budget-friendly setup can be built for a few hundred dollars focusing on essentials, while a full dream setup with premium furniture and multiple monitors can run into the thousands.
Do I need RGB lighting for a gaming room to look good? Not at all. Several of the setups above (like the dark academia and nature-inspired rooms) prove that warm, natural lighting can look just as intentional and impressive as RGB setups.
What’s the best layout for a small bedroom? Corner desks, wall-mounted monitor arms, and vertical storage solutions consistently work best for maximizing function in limited square footage.
Final Thoughts
After years of helping friends and family build their own gaming spaces, the biggest lesson I’ve learned is that the “best” setup isn’t about copying the most expensive or elaborate room you’ve seen online — it’s about understanding how you actually use the space and building around that. Whether it’s a minimalist battle station, a cozy console corner, or a full dream setup combining everything, the most successful gamer bedrooms are the ones designed around real habits, not just aesthetics. Pick a few ideas from this list that genuinely fit your space and lifestyle, and build from there.