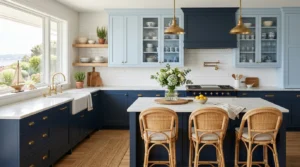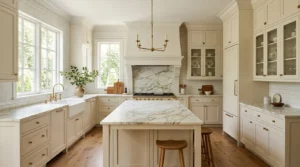
When I finished the main structural work on my kitchen renovation a while back, new cabinets, countertops, appliances, I genuinely thought the hardest decisions were behind me. Then I got to lighting my island, and I ended up spending almost as much time researching and testing options for that one specific element as I had for the entire rest of the kitchen combined. I went through three different pendant styles before landing on my final choice, and along the way I learned just how much lighting alone can make or break how an island actually functions and feels.
What surprised me most was how many separate considerations were actually involved, fixture style, obviously, but also mounting height, bulb color temperature, spacing between multiple fixtures, and even how the lighting interacted with my ceiling height and the island’s specific proportions. Getting all of these details right made a genuinely dramatic difference in the finished kitchen, arguably a bigger visual impact than several of the larger, more expensive renovation elements I’d initially assumed would matter most.
Since finishing my own project, I’ve helped a couple of friends navigate their own island lighting decisions too, each with different kitchen layouts and personal styles, which broadened my understanding of what actually works across different situations rather than just my own specific space. Here are 18 kitchen island lighting ideas I’ve personally tested, refined, or watched work well for others, all aimed at genuinely elevating your kitchen space through better island lighting.
1. Choose a Row of Matching Pendants for Visual Rhythm
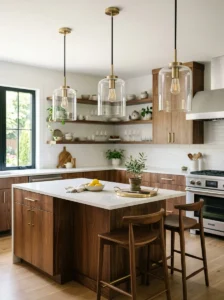
For my own island, which measures about eight feet long, I chose three matching glass pendant lights, evenly spaced along its length, rather than a single larger fixture or a mismatched cluster of different pendant styles. This repeated, evenly spaced arrangement creates a genuine sense of visual rhythm that draws the eye along the island’s full length rather than concentrating attention on just one spot.
Getting the spacing right took some careful measuring, I ultimately positioned my three pendants roughly 30 inches apart, center to center, which provided even illumination across the island’s work surface without any noticeably darker gaps between fixtures. I’d recommend, for anyone planning a similar multi-pendant arrangement, measuring your specific island’s length and dividing it into equal sections before finalizing fixture spacing, rather than eyeballing the placement, which can result in uneven, awkward gaps once the fixtures are actually installed.
This approach works particularly well for longer islands specifically, where a single fixture, however large, often struggles to provide adequate, even task lighting across the entire work surface. For shorter islands, two pendants or even a single well-chosen statement fixture may provide more proportionate coverage without the visual repetition feeling excessive relative to the island’s actual size.
2. Add a Single Oversized Statement Pendant
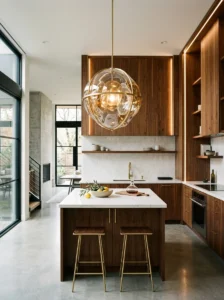
For islands with more limited length, or for anyone wanting a bolder, more dramatic visual statement, a single, oversized pendant fixture centered above the island can provide striking visual impact while still delivering adequate task lighting, provided the fixture’s design allows sufficient light to actually reach the work surface below rather than being purely decorative.
A friend with a smaller kitchen island chose this approach, selecting a large, sculptural glass pendant that became the room’s genuine focal point, visible clearly from her adjoining living area thanks to her home’s open floor plan. She specifically chose a fixture with an open, light-permeable design, rather than a solid, opaque shade, ensuring the statement piece still provided genuinely functional task lighting rather than existing purely as a decorative element disconnected from the island’s actual practical use.
I’d recommend, for anyone considering this single-statement-fixture approach, paying particularly close attention to the fixture’s actual light output and distribution pattern before purchasing, since a beautiful but poorly illuminating statement pendant can leave an island’s work surface frustratingly dim despite the fixture’s visual impact from a distance.
3. Layer Pendant Lighting With Under-Cabinet Task Lighting
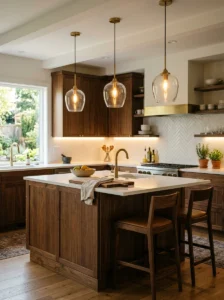
Beyond the pendant fixtures themselves, I added a layer of LED under-cabinet lighting throughout my kitchen, which, while technically illuminating the counter perimeter rather than the island directly, meaningfully improved the island’s overall lighting quality by reducing harsh shadows and providing more even ambient light throughout the whole kitchen space.
This layered approach matters because pendant lighting alone, however well-designed, often creates some degree of shadow directly beneath the fixture itself or along the island’s edges, depending on the specific fixture’s light distribution pattern. Supplementing pendant lighting with this additional ambient layer elsewhere in the kitchen genuinely improved my overall cooking and food preparation visibility, beyond what the island pendants alone provided.
I’d recommend, for anyone planning island lighting specifically, considering the broader kitchen lighting plan simultaneously rather than treating the island’s pendant fixtures as an entirely isolated decision, since the interaction between different light sources throughout the space genuinely affects how well any single fixture, including your island pendants, actually performs in practice.
4. Choose Warm-Toned Bulbs for Inviting Ambiance

Beyond the fixture style itself, bulb color temperature made a bigger difference than I initially expected. My first attempt used a cooler, more clinical-feeling bulb temperature, around 4000K, which technically provided plenty of brightness but made my kitchen feel sterile rather than warm and inviting, particularly during evening use.
Switching to warmer bulbs, around 2700K to 3000K, transformed the same fixtures into something considerably more welcoming, without sacrificing adequate brightness for actual food preparation tasks. This single change, essentially free since it just involved swapping bulbs rather than any fixture replacement, made a more dramatic difference to my kitchen’s overall evening atmosphere than several of the more expensive design decisions I’d made elsewhere.
I’d recommend, for anyone unsatisfied with their current island lighting’s overall feel despite liking the fixture itself, testing a bulb swap to a warmer color temperature before assuming a full fixture replacement is necessary, since this simple, low-cost change resolves the “cold, clinical” feeling in a surprising number of cases without requiring any further investment or installation work.
5. Add Dimmer Switches for Flexible Control
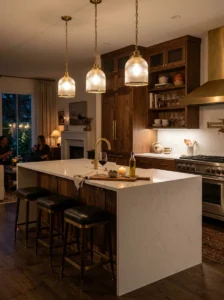
Installing a dimmer switch specifically for my island pendant lighting, separate from my kitchen’s other overhead and under-cabinet lighting circuits, provided genuine flexibility that a fixed-brightness setup simply couldn’t match. Bright, full illumination works well for active cooking and food prep, while a dimmed setting creates a considerably more relaxed atmosphere for evening entertaining or casual conversation around the island.
This required some basic electrical work during my renovation, and I’d recommend hiring a qualified electrician if you’re not comfortable handling this yourself, but the functional payoff, being able to adjust the island’s specific lighting mood independently from the rest of the kitchen, made this a worthwhile investment relative to its moderate cost and installation complexity.
For anyone with existing island pendant lighting not currently on a dimmer, retrofitting a dimmer switch is often a relatively straightforward electrical upgrade compared to a full fixture replacement, and it’s one of the most impactful, functionally useful additions I’d recommend prioritizing if your current setup only offers a single, fixed brightness level.
6. Mount Pendants at the Correct Height
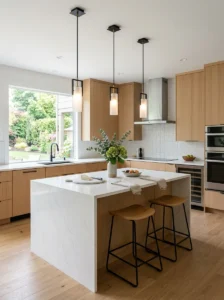
Getting my pendant fixtures’ mounting height correct took some trial and error, my first installation attempt hung them too high, which left the light spreading too broadly before reaching the counter surface and created a less focused, less flattering pool of task lighting than I wanted for actual food preparation.
The generally recommended guideline suggests mounting island pendants so their bottom edge sits roughly 30 to 36 inches above the counter surface, though this can vary somewhat depending on your specific ceiling height and the fixture’s size and light distribution pattern. I ultimately adjusted mine to sit about 32 inches above my counter, which provided both adequate headroom for anyone standing at the island and sufficiently focused task lighting directly onto the work surface below.
I’d recommend, for anyone installing new island pendants, temporarily hanging the fixtures at a testing height before final installation if possible, living with that height for a few days of actual cooking and evaluating both the visual proportion and functional lighting quality, rather than committing to a permanent mounting height based purely on general guidelines without testing it in your own specific space first.
7. Use Linear Chandelier Fixtures for a Modern Look
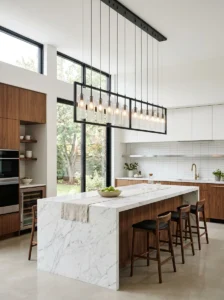
Rather than individual round pendants, a friend renovating her kitchen chose a single linear chandelier fixture, essentially a horizontal bar with multiple bulbs or small shades arranged along its length, positioned centered above her island. This style provides similar even, distributed lighting to a row of individual pendants but with a more unified, contemporary visual profile, since it reads as one cohesive fixture rather than several separate ones.
This kind of linear fixture tends to suit more contemporary or transitional kitchen styles particularly well, providing clean, modern lines that complement minimal, unornamented cabinetry and hardware choices throughout the rest of the space. She specifically chose a fixture with individually adjustable small pendant heads along the linear bar, allowing some flexibility in directing light toward specific areas of her island’s surface rather than a fixed, uniform distribution pattern.
For anyone considering this option, measuring your island’s length carefully before selecting a specific linear fixture size matters considerably, since an undersized fixture relative to the island’s length can look visually disproportionate, appearing to float awkwardly in the center rather than providing balanced coverage and visual weight across the island’s full length.
8. Choose Woven or Natural Material Pendant Shades
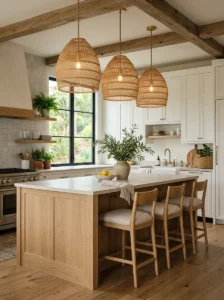
For a warmer, more textural approach, a friend with a more organic, natural-material kitchen aesthetic chose pendant fixtures with woven rattan or wicker shades, rather than glass or metal, which cast a distinctive, softly dappled light pattern across her island while also contributing genuine textural interest to the fixture’s daytime appearance when not illuminated.
This kind of natural material shade tends to diffuse light more softly than glass or exposed-bulb fixtures, creating a warmer, more ambient quality of light rather than sharp, direct task illumination. She supplemented these softer rattan pendants with additional under-cabinet task lighting elsewhere in her kitchen, acknowledging that the woven shades, while beautiful, weren’t providing quite as much direct, focused task lighting as a more open glass fixture might have on their own.
I’d recommend this kind of natural material shade specifically for kitchens already incorporating similar organic textures elsewhere, wood, rattan, woven baskets, since the lighting fixture then genuinely coordinates with an established material palette rather than introducing an isolated, disconnected textural element without broader context throughout the rest of the space.
9. Add Exposed Edison Bulb Pendants for Industrial Charm

For a more industrial-leaning kitchen aesthetic, exposed filament Edison-style bulbs, either bare or within simple, minimal cage-style fixtures, provide a distinctive, warm amber glow alongside genuine visual character from the bulb’s own visible filament design, rather than relying on an external shade to provide the fixture’s primary decorative interest.
I incorporated a version of this in my own kitchen actually, choosing simple black metal cage pendants with exposed Edison bulbs for a secondary lighting area near my kitchen’s small coffee station, distinct from my main island’s glass pendant fixtures, providing some intentional variety in fixture style between these two different functional zones within the same overall kitchen.
I’d recommend, for anyone considering this style specifically for island lighting, being mindful that exposed bulb fixtures typically provide less overall brightness and more ambient, moody lighting than a fixture with a reflective or light-diffusing shade, so supplementing with additional under-cabinet or overhead lighting elsewhere becomes particularly important if you want your island to remain genuinely functional for detailed food preparation tasks beyond just casual, ambient use.
10. Choose Brass or Gold-Toned Fixtures for Warmth
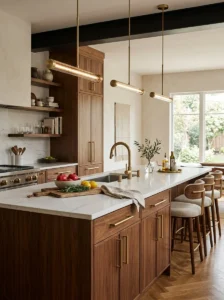
Beyond the shade material and bulb style, the fixture’s actual metal finish significantly affects a kitchen’s overall character. I chose brushed brass fixtures for my island pendants, which added a warm, slightly luxurious quality that felt more current and inviting than the cooler chrome or stainless finishes I’d initially considered before settling on this warmer alternative.
This warm metal tone also coordinated nicely with my other kitchen hardware choices, cabinet pulls and faucet fixtures in a similar brass finish, creating a cohesive metal palette throughout the kitchen rather than introducing an isolated, mismatched metal tone specifically through the lighting fixtures alone. I’d recommend, for anyone planning new island lighting, considering your existing or planned hardware finishes throughout the rest of the kitchen before finalizing a pendant fixture’s specific metal tone, since a mismatched combination of different metal finishes throughout the same space can feel visually disjointed rather than intentionally coordinated.
For kitchens leaning toward a cooler, more contemporary overall palette, brushed nickel or matte black fixtures might coordinate more naturally than brass, so this specific choice really depends on your kitchen’s broader established color and material story rather than existing as a universally “correct” choice across every possible kitchen style.
11. Use Multi-Light Chandeliers for Dramatic Impact
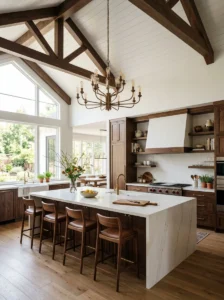
For islands in kitchens with higher ceilings, a friend chose a more elaborate, multi-arm chandelier-style fixture positioned centrally above her island, providing a genuinely dramatic focal point that a simpler pendant arrangement wouldn’t have achieved given her room’s more expansive proportions and higher ceiling height specifically.
This kind of more elaborate fixture works particularly well in open-concept kitchens where the island is visible from adjoining living or dining spaces, since the fixture then functions as a genuine architectural statement piece visible and appreciated from multiple angles and rooms throughout the broader connected living space, rather than existing purely as functional task lighting viewed only from within the kitchen itself.
I’d recommend this more dramatic approach specifically for kitchens with adequate ceiling height, at least nine or ten feet, to accommodate a larger fixture’s proportions without feeling cramped or overwhelming relative to the room’s actual vertical space, since a chandelier-style fixture that might look proportionate and striking in a tall, open room can feel oppressively large and low in a more standard eight-foot ceiling height kitchen.
12. Add Recessed Lighting as Supplemental Illumination
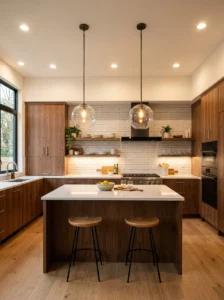
Beyond decorative pendant fixtures, incorporating a few recessed can lights directly into the ceiling above the island provides additional, more evenly distributed illumination that complements pendant lighting’s more focused, decorative quality. I added two small recessed lights flanking my three main pendant fixtures, providing supplemental brightness for particularly detailed food preparation tasks without needing to rely on the pendants alone for adequate task lighting.
This layered approach, decorative pendants combined with more purely functional recessed lighting, provides genuine flexibility, since the recessed lights can be used alone for simple, quick tasks requiring minimal ambiance, or combined with the pendant lighting for a fuller, more layered illumination during more involved cooking projects or evening entertaining.
I’d recommend, for anyone planning this kind of layered approach, putting the recessed lighting on a separate switch or dimmer from the decorative pendants, similar to the dimmer switch recommendation covered earlier in this list, which provides maximum flexibility in adjusting the island’s overall lighting scheme based on the specific activity and desired atmosphere at any given time.
13. Choose Colored Glass Shades for a Pop of Personality
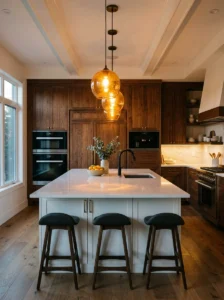
For a friend wanting to introduce more personality and color into an otherwise fairly neutral kitchen renovation, colored glass pendant shades, in her case a deep amber tone, provided a distinctive visual element and a warm, amber-toned glow when illuminated, adding genuine character beyond what a standard clear or white glass shade would have provided.
This kind of colored glass shade affects not just the fixture’s daytime decorative appearance but also the actual quality and tone of light it casts when illuminated, so I’d recommend, for anyone considering this option, viewing the specific fixture actually illuminated, either in a showroom or through detailed product photography and video, before committing, since a colored shade’s effect on the room’s overall lighting quality can be harder to predict from static, unlit product photos alone compared to a standard clear glass option.
She limited this colored glass detail specifically to her island pendants, keeping her remaining kitchen lighting in more neutral, clear or white tones, which let this specific colored element function as an intentional accent and personality touch rather than affecting the entire kitchen’s overall lighting color quality throughout every fixture simultaneously.
14. Use Smart Bulbs for Adjustable Color Temperature
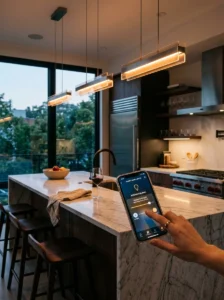
Beyond a standard dimmer switch, I eventually upgraded my island pendant bulbs to smart bulbs specifically capable of adjusting both brightness and color temperature through a phone app, allowing me to shift from bright, cooler-toned lighting during active cooking to warm, dim ambiance for evening use, all from the same physical fixtures without needing to manually swap bulbs for different occasions.
This smart bulb approach provides even more flexibility than a standard dimmer alone, since color temperature adjustment specifically addresses the different lighting needs of active food preparation versus relaxed evening entertaining, which a simple brightness dimmer alone doesn’t fully address on its own. I’ve found myself using this flexibility regularly, shifting to a cooler, brighter setting each morning while preparing breakfast, then transitioning to a warmer, dimmer setting for evening meals and gatherings around the island.
I’d recommend this upgrade specifically for anyone who noticed, after installing standard dimmable bulbs, that they still wanted more flexibility than brightness adjustment alone provided, since the additional cost of smart bulbs over standard dimmable options is relatively modest relative to the genuine functional flexibility this added color temperature control provides throughout daily use.
15. Choose Fixtures That Complement Your Island’s Material
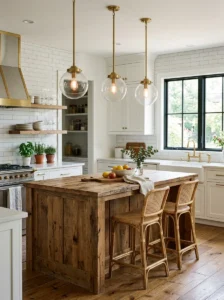
I made sure my pendant fixtures’ overall visual weight and style genuinely complemented my island’s specific countertop and cabinetry materials, rather than selecting lighting in complete isolation from these other established design elements. My island features a reclaimed wood countertop, and I chose pendants with some visible metal and glass texture that provided enough visual weight and material interest to feel proportionate against that substantial, textured countertop material, rather than a delicate, overly minimal fixture that might have looked visually insufficient against the island’s already strong material presence.
This kind of material coordination matters considerably for how cohesive the finished kitchen feels overall, a fixture selected purely based on its individual appeal, without considering how it relates to the island’s other established materials and overall visual weight, can end up feeling disconnected or mismatched once actually installed in context, even if the fixture itself is beautifully designed and well-constructed on its own.
I’d recommend, before finalizing any pendant fixture choice, viewing product photos or samples directly alongside your specific countertop and cabinetry material samples, similar to how you might test paint swatches against existing materials, rather than relying purely on how the fixture appears in isolated product photography without this broader context consideration.
16. Add Adjustable Track Lighting for Flexibility
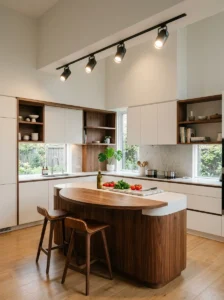
For a friend with a somewhat unconventional island shape and placement, standard pendant lighting positioned in a fixed, symmetrical arrangement didn’t quite suit her specific layout, so she instead chose an adjustable track lighting system, allowing individual light heads to be repositioned and aimed as needed to accommodate her island’s less standard proportions and placement relative to her ceiling structure.
This kind of adjustable system provides genuine flexibility for irregular layouts, allowing lighting to be customized and readjusted over time as furniture or usage patterns within the kitchen potentially change, rather than committing to a fixed pendant arrangement that assumes a standard, symmetrical island shape and central ceiling positioning relative to that island.
I’d recommend this track lighting approach specifically for kitchens with non-standard island shapes, unusual ceiling angles, or other layout irregularities that make a standard symmetrical pendant arrangement genuinely impractical, rather than as a first-choice option for more conventional, standard rectangular islands where dedicated pendant fixtures typically provide a more polished, intentional-looking final result.
17. Balance Fixture Scale With Island Proportions
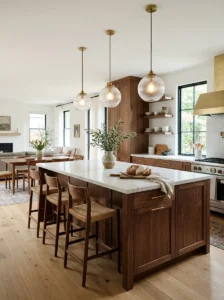
One of the more subtle but important lessons from my own project, and from helping friends with theirs, is that fixture scale relative to the island’s actual size matters enormously for the finished result looking genuinely proportionate rather than either overwhelming or insufficient. My first pendant selection, before I ultimately changed course, was actually too small relative to my island’s substantial eight-foot length, and the fixtures looked visually lost and insufficient once actually installed, despite looking reasonably sized in isolated product photography.
I’d recommend, before finalizing any pendant selection, measuring your specific island’s length and width, then researching general sizing guidelines relating fixture diameter and overall scale to island dimensions, rather than judging a fixture’s appropriate scale purely based on how it appears in a retailer’s staged product photography, which often doesn’t provide an accurate sense of true proportional scale relative to your own specific space and island dimensions.
This scale consideration applies whether you’re choosing a single statement fixture or multiple smaller pendants arranged in a row, in both cases, the fixture’s actual physical size needs to feel genuinely proportionate to your specific island’s dimensions, rather than either disappearing insignificantly against a large island or overwhelming a smaller one with an oversized fixture that dominates the space disproportionately.
18. Test Lighting at Different Times of Day Before Finalizing
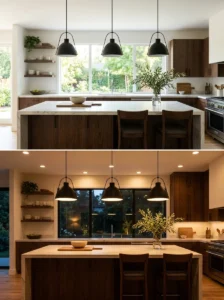
The final and perhaps most valuable lesson from my own island lighting project was the importance of actually living with a temporary or trial lighting setup for a few days before committing to final fixture selection and mounting height, evaluating how the lighting performed and felt during actual morning cooking, midday tasks, and evening entertaining, rather than judging based purely on a single evaluation moment or static product photography alone.
I discovered, through this kind of extended testing period, that my initial fixture and bulb temperature choice looked perfectly appropriate during a brief evening showroom visit but felt notably too dim and yellow-toned for genuine morning food preparation tasks once I actually lived with it in my own kitchen across different times of day and different specific activities.
I’d recommend, for anyone planning significant investment in island lighting specifically, requesting a trial period or thoroughly researching return policies before committing to expensive fixtures, and if possible, temporarily hanging even basic, inexpensive placeholder fixtures at your planned height and testing bulb color temperatures for at least a few days of actual daily use before finalizing your genuine, permanent fixture selection and installation.
Frequently Asked Questions
How many pendant lights do I need for my kitchen island? This depends on your island’s length, but a general guideline suggests one pendant for every two to three feet of island length, spaced evenly, though a single statement fixture can also work well for shorter islands.
What’s the ideal height to hang pendant lights above an island? Most designers recommend mounting the bottom of the fixture 30 to 36 inches above the counter surface, though this can vary somewhat based on your specific ceiling height and the fixture’s size.
Should island lighting match the rest of my kitchen’s fixtures? Not necessarily, though coordinating the general metal finish and overall style helps maintain cohesion. Many well-designed kitchens use a slightly different, more decorative fixture style specifically for the island as an intentional focal point.
Is it worth investing in smart bulbs for kitchen island lighting? For most people, yes, since the ability to adjust both brightness and color temperature provides genuine functional flexibility between bright task lighting and warm evening ambiance, at a relatively modest additional cost over standard dimmable bulbs.
Final Thoughts
That drawn-out process of testing and reconsidering my own island lighting, far longer than I initially expected to spend on what seemed like a relatively small decision within a much larger renovation, taught me that lighting genuinely deserves this level of careful consideration given how much it affects both a kitchen’s function and its overall atmosphere. Prioritize getting the fixture scale, mounting height, and bulb color temperature right before worrying too much about the specific decorative style, since these functional fundamentals affect your daily experience far more than the fixture’s appearance alone. Get those elements right, and even a relatively simple, affordable pendant choice can genuinely elevate your entire kitchen space.