For the longest time, our kitchen shelves were purely functional in the most boring sense of the word, mismatched containers, a few dusty spice jars shoved to the back, and absolutely nothing that looked intentional about any of it. I only started paying real attention to how shelving actually looked, not just what it held, after a small kitchen renovation forced me to rethink the whole wall from scratch. What I learned in the process is that good kitchen shelving isn’t a trade-off between storage and style, the best setups genuinely do both, you just have to plan for it rather than treating shelves as an afterthought once the cabinets are done.
Since that renovation, I’ve helped a couple of friends rework their kitchen shelving too, and picked up plenty of small, practical lessons about what actually holds up to daily cooking versus what only looks good for the first photo. Below are 21 kitchen shelf ideas that balance genuine, everyday storage with a look you’ll actually want to see every time you walk into the room.
1. Open Wood Shelving Above the Counter
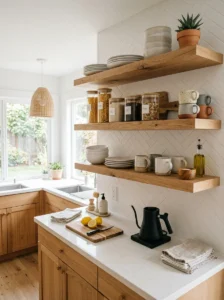
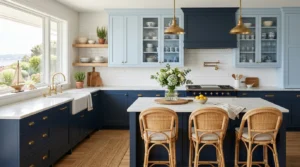
Open wood shelves mounted above the counter were the very first change we made in our own kitchen, replacing a set of bulky upper cabinets that made the whole room feel darker and more closed in than it needed to be. The difference was immediate. Not only did the kitchen feel visually larger and brighter, but everyday items, plates, bowls, mugs, became genuinely easier to reach without opening and closing cabinet doors dozens of times a day.
The wood we chose was a simple, unfinished oak, sanded smooth but left with a natural, slightly warm tone rather than a heavy stain, which let it work with almost any dish or container color we placed on it. I’d recommend solid wood over engineered options if your budget allows, since open shelves in a kitchen are exposed to more humidity and heat than shelving elsewhere in the house, and solid wood tends to hold up better over years of that exposure without warping.
The honest trade-off with open shelving is that everything on display needs to stay reasonably tidy, there’s no door to hide behind on a chaotic day. I keep our shelves loosely organized by category, plates and bowls on one level, mugs and glasses on another, and it’s genuinely become easier to maintain than I expected, mostly because seeing everything encourages me to put things back properly rather than shoving them into a closed cabinet however they fit.
2. Floating Shelves in Matte Black
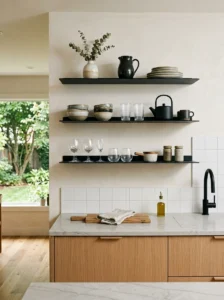
Floating shelves with no visible brackets create a clean, almost architectural look that works particularly well in a kitchen with a more modern aesthetic. I installed a pair of matte black floating shelves in a friend’s kitchen renovation, replacing an awkward, underused corner, and the sleek, minimal look made even a fairly small kitchen feel more considered and finished.
The mounting hardware for a true floating shelf is hidden entirely within the wall, which gives the illusion that the shelf is simply attached with no visible support at all. This does require a bit more precision during installation, finding solid studs and using the correct hardware for the shelf’s expected weight, since floating brackets generally have a lower weight capacity than traditional visible bracket systems. I’d strongly recommend having these professionally installed, or at minimum using a stud finder carefully, since a floating shelf that isn’t properly anchored is one of the more common kitchen shelving failures I’ve come across.
Matte black specifically works beautifully as a contrast against lighter kitchen walls or cabinetry, and it tends to photograph and read as more sophisticated than a natural wood finish in a modern kitchen setting. I’d suggest keeping the items displayed on black floating shelves relatively curated rather than densely packed, since the shelf’s minimal, sleek design tends to suit a slightly more restrained styling approach than the fuller, more layered look that open wood shelving often carries well.
3. Corner Shelving for Awkward Nooks
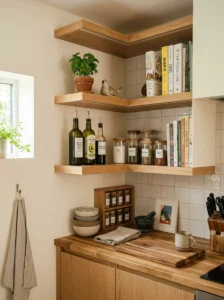
Kitchen corners are notoriously difficult to use efficiently, too deep for a standard cabinet to reach fully into, but too awkward to simply leave empty. Custom corner shelving, built specifically to follow the angle of the space, solved exactly this problem in our own kitchen, where an oddly shaped corner beside the stove had sat essentially unused for years before we finally addressed it.
We used a set of three shelves, each slightly smaller than the one below it, angled to fit the corner’s specific geometry rather than forcing standard rectangular shelves into an irregular space. This design let us reclaim what had genuinely been dead space before, now used for everyday items like cooking oils, a small collection of cookbooks, and a few decorative pieces on the top shelf.
I’d recommend having corner shelves custom-measured rather than trying to adapt pre-made shelving to an irregular space, since even a small mismatch in angle or depth can leave you with an uneven, wobbly-looking result. If your budget doesn’t stretch to fully custom shelving, a simpler L-shaped bracket system designed specifically for corners is a reasonably priced middle ground that still makes better use of the space than leaving it empty or relying on a single, oddly-placed straight shelf that doesn’t actually reach into the deepest part of the corner.
4. Glass-Front Cabinet Shelving
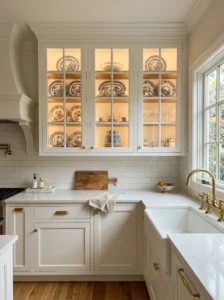
For anyone who wants the organized, tidy look of closed cabinets but still wants to showcase beautiful dishware, glass-front cabinets offer a genuine middle ground between fully open and fully closed storage. We converted two of our upper cabinet doors to glass-front panels during our renovation, keeping the rest of the kitchen’s storage in standard solid-door cabinets, and it gave us a dedicated spot to display a set of vintage plates without needing to worry about dust settling directly on them.
The practical advantage over fully open shelving is real, dust and grease from cooking accumulate much more slowly behind a closed glass door than on completely exposed shelves, which matters especially for cabinets positioned near the stove. I’d recommend reserving glass-front cabinets for your more decorative or special-occasion dishware specifically, rather than everyday plates and bowls, since the display quality of glass fronts is somewhat wasted on plain, mismatched everyday items.
Interior lighting makes a significant difference here too. We added a small LED strip inside each glass-front cabinet, and the difference between the display in daylight versus in the evening with the interior light on was honestly dramatic, the dishware seemed to glow softly rather than just sitting in shadow behind the glass. If you’re considering this upgrade, I’d suggest budgeting for this lighting addition from the start, since retrofitting it into an already-installed cabinet is considerably more difficult than wiring it in during the initial renovation.
5. Wire Basket Pull-Out Shelving
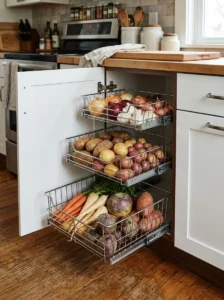
Deep, wire pull-out baskets, installed in the lower sections of a kitchen where traditional shelves make items at the back nearly impossible to reach, solved one of the most frustrating storage problems in our own kitchen. Before this upgrade, our lower cabinet had become a place where items genuinely got lost, pushed to the back and forgotten until we did an occasional, frustrating deep clean.
The pull-out mechanism lets the entire basket glide forward on smooth rails, bringing everything into full view and reach without needing to crouch down and dig blindly into a dark cabinet. We use ours specifically for root vegetables, onions and potatoes, since the open wire design allows airflow that helps these particular items last longer than they would sealed in a closed drawer or bin.
I’d recommend investing in a quality soft-close rail mechanism rather than a basic sliding track, since these baskets get opened and closed multiple times daily, and a poor-quality mechanism tends to become sticky or misaligned within a year of heavy use. We learned this after our first, cheaper installation started sticking within several months, requiring a full replacement. For anyone with deep lower cabinets that feel like wasted or frustrating space, this upgrade genuinely transforms how usable that storage actually is day to day.
6. Ladder Shelf for Vertical Storage
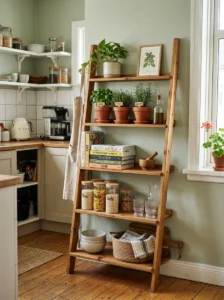
A freestanding ladder-style shelf, leaned casually against an empty wall rather than mounted, is a flexible storage solution that works particularly well in kitchens without much room for built-in shelving, or for renters who can’t make permanent wall modifications. I set one up in a small apartment kitchen a while back, using it to hold a mix of cookbooks, a few potted herbs, and everyday glassware, and it added genuine storage without requiring any drilling into the walls at all.
The gently angled design means each shelf is slightly set back from the one below it, which creates a naturally tiered, easy-to-see display rather than everything lined up in a flat row. This visual layering makes even a fairly small collection of items look considered and styled rather than simply placed wherever there was room. Because the unit is freestanding, it’s also easy to reposition entirely if you rearrange your kitchen layout or move to a new space altogether.
Weight distribution matters more with a ladder shelf than with wall-mounted options, since it relies on its own base and the wall it leans against for stability rather than being anchored directly into the wall structure. I’d recommend keeping heavier items on the lower shelves and lighter, more decorative pieces higher up, both for practical stability and because it naturally draws the eye downward in a balanced way. This is one of the most affordable and low-commitment shelving ideas on this list, genuinely well suited to anyone renting or simply not ready for a permanent installation.
7. Shelving with Integrated Under-Lighting
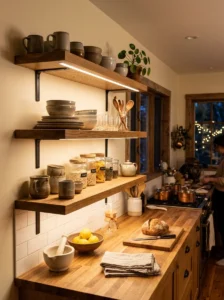
Adding LED strip lighting beneath open shelves is a relatively small addition that makes a noticeably large difference, both in the shelf’s practical usability for tasks like reading recipes or measuring ingredients, and in how the whole display looks once evening falls. We retrofitted warm LED strips beneath our open wood shelves a year or so after the initial installation, and I genuinely wondered afterward why we hadn’t done it from the very beginning.
Beyond the ambient glow, which does add real atmosphere to the kitchen in the evening, the practical lighting boost directly onto the counter below has made prep work noticeably easier, especially since our kitchen’s main overhead lighting doesn’t reach that particular counter section very effectively on its own. I’d recommend battery-operated or plug-in LED strips with an adhesive backing if you’re retrofitting existing shelves, since running new wiring after installation is a bigger, more disruptive project than most people want to take on for what’s ultimately a fairly small addition.
Warm white LEDs, rather than cool white, again make a real difference here, casting a cozy, golden light that suits a kitchen far better than a stark, clinical glow. Motion-sensor or simple remote-controlled strips add convenience too, letting you turn the under-shelf lighting on only when you’re actually using that section of the counter, rather than leaving it running constantly or fumbling for a switch each time.
8. Plate Rail Shelving
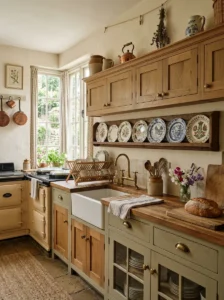
A plate rail, a narrow shelf with a small groove or lip specifically designed to hold plates upright and on display rather than stacked flat, brings a charming, slightly old-fashioned character to a kitchen that standard flat shelving doesn’t achieve. I installed one in a client’s kitchen specifically to showcase a small collection of hand-painted plates she’d inherited, and displaying them upright rather than stacked in a cabinet let their individual patterns actually be seen and appreciated daily rather than hidden away.
The groove or lip along the front of the rail is what keeps plates securely upright rather than sliding forward, and I’d recommend checking that this groove is deep enough for your specific plate thickness before installation, since some decorative or heavier plates need a slightly deeper channel than the standard, thinner design accommodates. We measured our client’s largest and thickest plates specifically before finalizing the rail’s groove depth, which avoided an awkward mismatch after installation.
Plate rails work particularly well positioned at eye level or slightly above, rather than very high on the wall, since the entire point is visibility and appreciation of the plates’ individual designs, which gets lost if they’re mounted too high to actually see clearly from a normal standing position. I’d suggest reserving this style specifically for decorative or meaningful plates rather than everyday dishware, since the display format inherently draws attention to each piece individually, working best when what’s displayed actually has some visual or sentimental interest.
9. Open Shelving with Woven Basket Storage
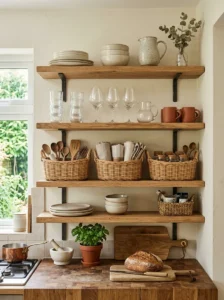
Combining open shelving with a collection of woven baskets gives you much of the visual warmth and accessibility of open storage while still concealing smaller, less attractive items that don’t necessarily need to be on full display, like loose packets, cleaning supplies, or miscellaneous kitchen tools. We use a row of small woven baskets along the lower section of our open shelving specifically for this purpose, keeping the upper shelves for our more visually appealing dishware and glassware.
The natural texture of woven baskets, rattan, seagrass, or water hyacinth, complements wood shelving particularly well, creating a cohesive, earthy look rather than the visual clash you sometimes get when purely plastic or metal storage bins sit alongside natural wood shelves. I’d recommend choosing baskets with handles specifically for the items you’ll need to access most frequently, since being able to simply lift a basket down rather than digging through it while it’s still on the shelf makes daily use considerably more convenient.
Labeling baskets, either with a small tag or a simple label directly on the basket itself, is a detail I’d genuinely recommend if you’re storing several visually similar baskets side by side, since it’s easy to forget which basket holds what once you have more than two or three in a row. This is a particularly good option for kitchens that need to balance open, accessible storage with keeping certain items out of direct view, without going all the way to fully closed cabinet doors.
10. Marble or Stone Floating Shelves
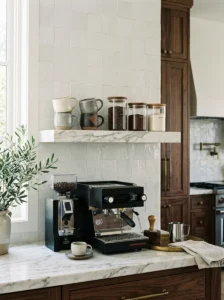
For a more luxurious, elevated take on open shelving, a marble or natural stone shelf brings a level of visual richness that wood or standard painted shelving simply can’t match. We installed a single marble floating shelf above our coffee station specifically, rather than using it throughout the whole kitchen, both for budget reasons and because a smaller, more contained use of the material tends to feel more intentional than an overwhelming amount of stone throughout the space.
Stone shelving is considerably heavier than wood, which means installation requires more robust mounting hardware and, in most cases, professional installation to ensure it’s properly anchored into wall studs. I’d strongly recommend not attempting a DIY installation for a stone shelf specifically, given both the weight involved and the genuine risk of a poorly secured shelf failing under load, unlike a lighter wood shelf where a home installation is more reasonably within reach for most people.
The cool, smooth surface of marble or stone also makes an excellent spot for items like a stack of ceramic mugs or a small collection of glass jars, where the material’s natural veining and subtle color variation become a genuine design feature rather than just a functional surface. I’d suggest keeping styling on a stone shelf relatively minimal and curated, letting the material itself be the visual highlight, rather than crowding it with too many competing items that distract from the stone’s natural beauty.
11. Shelving Above the Window
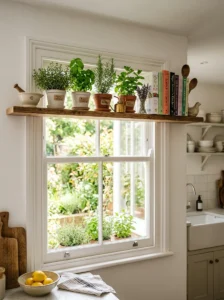
The wall space directly above a kitchen window often goes completely unused, yet it’s frequently one of the better-lit spots in the entire room, making it a genuinely underrated location for a slim shelf. We added a narrow floating shelf above our kitchen window specifically to hold a small collection of potted herbs, and the combination of good natural light and the otherwise wasted space made it one of the more practical additions we’ve made to the kitchen.
Because this shelf sits higher and slightly out of easy everyday reach, I’d recommend using it for items you don’t need constant daily access to, decorative pieces, less frequently used cookbooks, or plants that benefit from the elevated light exposure, rather than everyday dishware or cooking tools you’d want within easy reach. In our case, the herbs actually thrive in this spot specifically because of the light, something they hadn’t gotten nearly as much of on our lower counter before we relocated them.
I’d suggest keeping this shelf relatively shallow, both because the space above a window frame is often limited in depth, and because a shelf that’s too deep can start to visually crowd the window and block more light than necessary. A simple, slim design in a finish that matches your window frame or trim tends to look most cohesive, making the shelf read as an intentional architectural extension of the window itself rather than a separate, disconnected addition to the wall.
12. Shelving with Hanging Rail for Utensils
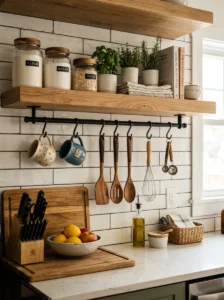
Combining a shelf with a mounted rail beneath it, specifically for hanging utensils, pots, or mugs via S-hooks, maximizes vertical space efficiently while keeping frequently used items genuinely within easy reach during actual cooking. We added a simple metal rail beneath one of our open shelves directly above the stove, and it’s transformed how quickly I can grab a specific spatula or ladle mid-cooking, rather than digging through a crowded utensil crock on the counter.
The rail itself is a fairly inexpensive addition, typically just a length of metal rod or pipe mounted with simple brackets beneath an existing or new shelf, and S-hooks of varying sizes let you hang everything from lightweight utensils to slightly heavier items like a small pan or a mug. I’d recommend positioning this specific combination near your stove or main prep area, since the whole point is convenience during active cooking, rather than in a less frequently used section of the kitchen where the accessibility benefit would largely go to waste.
One practical consideration: hanging pots or pans via this method does mean they’re on constant display, which works beautifully if you have a nice matching set, but can look cluttered with a mismatched collection of dented, well-worn cookware. I’d suggest reserving the rail specifically for your better-looking utensils and pots, keeping older or mismatched pieces in a closed cabinet instead, so the overall display stays looking intentional rather than like an overflow storage solution.
13. Two-Tone Shelving with Contrasting Brackets
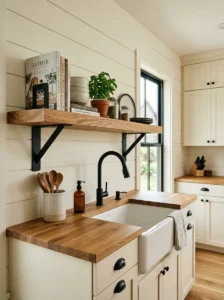
Pairing a natural wood shelf with brackets in a bold, contrasting color, black, brass, or a deep painted hue, adds a small but genuinely effective design detail that elevates otherwise standard open shelving. We used simple black L-brackets beneath our light oak shelves, and the contrast between the warm wood tone and the sharp black hardware gave the whole setup a more considered, custom look than matching wood-toned brackets would have achieved.
This is a particularly good option for anyone wanting to add visual interest to a fairly standard, budget-friendly shelf without a significant additional cost, since swapping bracket color or finish is a relatively small expense compared to sourcing a more elaborate or specialty shelf material. I’d recommend choosing a bracket finish that echoes another metal element already present in your kitchen, cabinet hardware, faucet finish, or light fixtures, so the contrasting brackets feel like part of a cohesive design scheme rather than an isolated, disconnected choice.
Bracket style matters visually too, beyond just color. A simple, clean L-bracket reads as more modern and minimal, while a more decorative scrolled or forged bracket leans toward a warmer, more traditional or rustic feel. I’d suggest choosing a bracket style that matches your kitchen’s overall aesthetic direction first, then selecting the contrasting color or finish second, since a style mismatch tends to be more visually jarring than a color choice that’s slightly off from the rest of the room.
14. Recessed Shelving Within Wall Cavities
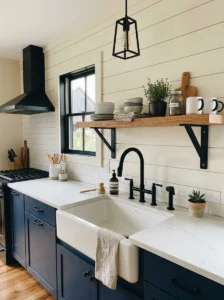
For kitchens undergoing more significant renovation, building shelving directly into a recessed wall cavity, rather than mounting it as a separate unit on the wall’s surface, creates a sleek, built-in look that reads as genuinely architectural rather than added on afterward. We did this during our renovation in a section of wall that backed onto an unused space between studs, and the resulting recessed shelf looks like it was always part of the home’s original structure rather than a later addition.
This approach requires more substantial construction work than any other idea on this list, generally involving opening up the wall, working around plumbing or electrical lines if present, and finishing the recess with matching drywall, paint, or tile before the actual shelves go in. I’d strongly recommend consulting with a contractor before pursuing this option, both to confirm the wall cavity is actually usable in your specific home’s structure, and to ensure no critical wiring or plumbing runs through the space you’re planning to recess into.
The payoff for this extra effort and cost is a shelf that has zero visual footprint beyond the recess itself, no brackets, no visible mounting hardware, nothing protruding into the room. This clean, integrated look works particularly well in smaller kitchens where every inch of usable floor and wall space matters, since a recessed shelf doesn’t add any bulk to the room the way even a slim floating shelf technically does.
15. Shelving Styled with Cookbooks as Decor
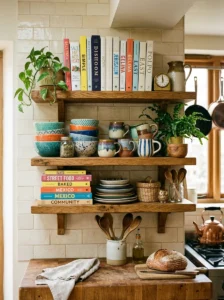
Rather than tucking cookbooks away in a drawer or a separate room entirely, displaying a curated selection on open kitchen shelving turns genuinely useful reference material into an attractive part of the room’s overall styling. I keep a rotating selection of about eight to ten cookbooks on our open shelves, favorites I actually reference regularly, alongside a few with particularly beautiful spines or covers that add color and visual interest even when I’m not actively using them.
The practical benefit here is real too, having cookbooks genuinely at hand while cooking, rather than stored elsewhere in the house, means I actually reference them more often instead of defaulting purely to searching online for recipes. I’d recommend grouping cookbooks together in a single section of your shelving rather than scattering individual books across multiple shelves, since a concentrated cluster reads as an intentional library corner, while scattered individual books can look more like clutter left in random spots.
Mixing book spine colors and sizes, rather than organizing purely by height for a uniform look, tends to feel more natural and lived-in within a kitchen setting specifically, since the room’s overall character usually leans warmer and more casual than a highly styled formal bookshelf elsewhere in the home. I’d also suggest occasionally rotating which books are on display, keeping your most-used, current favorites visible while less frequently referenced ones move to storage elsewhere, refreshing the display every so often without needing to buy anything new.
16. Shelving for a Coffee or Tea Station
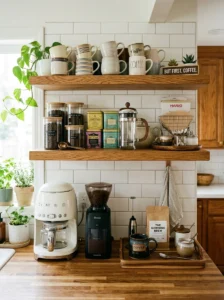
Dedicating a specific section of shelving entirely to coffee or tea supplies, mugs, filters, a French press, a small collection of tea tins, creates a clear, organized zone that makes the daily ritual of making a hot drink noticeably smoother and more enjoyable. We set up a dedicated coffee shelf a couple of years ago after growing tired of hunting through different cabinets for mugs, filters, and beans scattered in three separate locations, and consolidating everything into one spot genuinely simplified our morning routine.
I’d recommend positioning this dedicated shelf close to an outlet if you’re also housing an electric kettle or coffee maker on the counter directly beneath it, so cords don’t need to stretch awkwardly across the counter from a distant outlet. Grouping items by type within the shelf, mugs on one section, dry goods like coffee or tea on another, keeps the display organized and genuinely functional rather than becoming a catch-all for anything vaguely coffee-related.
A small tray or a shallow dish specifically for holding spoons or a milk frother adds a nice finishing touch and keeps smaller loose items contained rather than sliding around the shelf surface. I’d also suggest a couple of open glass jars for visible coffee beans or loose tea, both for easy access and because they add genuine visual interest and color to the display, something a row of sealed, opaque packaging simply doesn’t achieve on its own.
17. Shelving with a Built-In Spice Rack
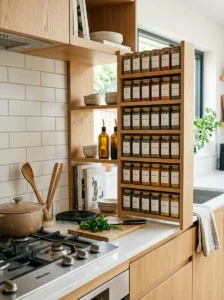
Integrating a dedicated, narrow spice rack directly into your kitchen shelving, rather than keeping spices scattered in a cabinet or a separate drawer, makes a genuinely significant difference in how quickly and easily you can find what you need mid-recipe. We built a narrow, stepped spice shelf directly beside our stove specifically, with each row slightly higher than the one in front of it so every jar’s label remains visible without needing to move anything aside.
Positioning the spice rack close to your main cooking area matters enormously for actual daily convenience, since a spice rack tucked away in a distant cabinet somewhat defeats its own purpose if you still need to walk across the kitchen mid-recipe to grab what you need. I’d recommend decanting spices into matching, uniform jars if you have the time and inclination, since a row of identical containers with clear, consistent labeling looks considerably more polished than a mismatched collection of original packaging in various shapes, sizes, and faded labels.
Heat exposure is worth considering here too, though. While positioning a spice rack near the stove is convenient, direct heat and light exposure can degrade spices somewhat faster over time compared to a cooler, darker storage spot. I’d suggest keeping your spice rack a reasonable distance from the stove’s most direct heat rather than immediately adjacent to it, and replacing your most frequently used spices regularly enough that this gradual degradation isn’t a significant practical concern in daily use.
18. Shelving with Hidden Cord Management
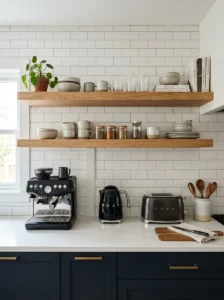
For open shelves that also house small kitchen appliances, a toaster, an electric kettle, a coffee grinder, incorporating hidden cord management keeps the whole display looking tidy rather than visually cluttered with tangled cords hanging down the wall or across the counter. We added a simple channel behind our open shelving specifically to route appliance cords down to a hidden outlet, rather than letting them dangle visibly in front of the shelf.
This is a detail that’s much easier to plan for during an initial installation or renovation than to retrofit afterward, since running a cord channel behind an already-mounted shelf and finished wall is considerably more disruptive than including it from the start. If you’re not doing a full renovation, a simpler solution is using adhesive cord clips along the back or underside of an existing shelf, which won’t fully hide cords but does keep them neatly routed rather than hanging loose and creating visual clutter.
I’d recommend this detail specifically for shelving positioned directly above a counter where small appliances actually live day to day, rather than purely decorative shelving elsewhere in the kitchen where cord management isn’t a relevant concern. It’s a small, easy-to-overlook detail during planning, but it makes a noticeable difference in how clean and considered a functional shelf actually looks once appliances and their cords are factored into the daily reality of the space, rather than just the empty, styled version shown in photos.
19. Shelving That Follows a Sloped or Angled Ceiling
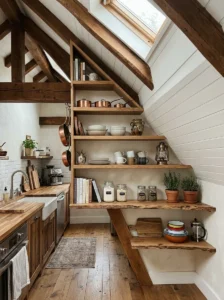
For kitchens with a sloped or angled ceiling, often found in attic conversions or homes with more architecturally interesting rooflines, custom shelving built specifically to follow that slope makes far better use of the space than standard rectangular shelving awkwardly fitted beneath an angled surface. We designed a stepped shelving unit for a client’s sloped-ceiling kitchen, with each shelf’s depth adjusted to follow the ceiling’s angle, rather than forcing uniform, standard-depth shelves into a space where the available depth actually changes as you move along the wall.
This kind of custom design requires more careful measuring and planning than standard shelving, since the depth needs to be calculated at multiple points along the slope rather than assumed as a single consistent measurement. I’d recommend working with a carpenter who can visit and measure the actual space directly, rather than trying to estimate angled dimensions remotely, since even small errors in an angled installation tend to be more visually obvious than similar errors on a standard flat wall.
The payoff for this extra planning effort is shelving that looks genuinely built for the space rather than awkwardly retrofitted into it, and it reclaims storage capacity that would otherwise go completely unused beneath a sloped ceiling. This approach works particularly well for lighter, less frequently accessed items on the shallower upper sections of the slope, saving the deeper, more accessible lower shelves for your everyday cooking essentials and dishware.
20. Shelving Painted to Match the Wall
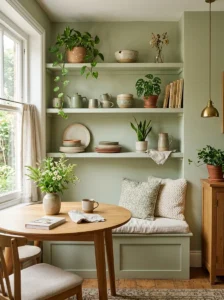
For a more seamless, blended look, painting open shelves the exact same color as the surrounding wall, rather than leaving them in a contrasting wood tone or a different finish entirely, makes the shelves themselves recede visually while the items displayed on them become the clear focal point. We tried this approach in a small kitchen nook, painting simple shelves the same soft sage green as the surrounding wall, and the effect made the whole display feel more like curated art installed directly on the wall rather than separate furniture attached to it.
This technique works particularly well for kitchens with a limited color palette that you want to keep clean and uncluttered visually, since removing the additional color or texture variation that a wood-toned or contrasting shelf would introduce lets everything else in the room, cabinetry, backsplash, displayed items, read more cohesively as a single, considered space. I’d recommend a matte or eggshell finish rather than anything glossy for this specific approach, since a glossy shelf finish tends to catch light differently than a matte wall, undermining the seamless, blended effect you’re going for.
The practical trade-off is that painted shelves generally show wear, scuffs, chips, more visibly over time than a natural wood finish, particularly in a high-use area like a kitchen where shelves get bumped and items get slid on and off regularly. I’d suggest keeping a small amount of matching touch-up paint on hand specifically for this reason, so minor wear can be addressed quickly rather than being left to accumulate and eventually stand out against the clean, blended look you originally installed.
21. Modular Shelving System for Flexible Storage
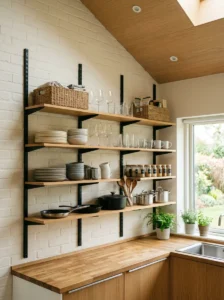
A modular shelving system, using a track-and-bracket setup that allows individual shelves to be added, removed, or repositioned as needed, offers genuine long-term flexibility that fixed shelving simply can’t match. We installed this system in our own kitchen specifically because our storage needs have changed noticeably over the past few years, more glassware after a wedding, fewer large serving pieces after downsizing our entertaining, and being able to adjust the actual shelf configuration without any major construction has proven genuinely valuable multiple times since installation.
The system works by mounting vertical tracks directly into wall studs, with individual shelf brackets that clip into the track at whatever height you need, allowing you to add a new shelf, remove one entirely, or adjust spacing in a matter of minutes without tools beyond what’s needed for the initial track installation. I’d recommend this option specifically for anyone renovating a kitchen they expect to live in long-term, since the ability to adapt the shelving over years of changing needs offers real value that’s easy to underestimate at the time of a single, fixed installation.
Visually, a well-chosen modular system doesn’t need to look industrial or utilitarian; many available track and bracket designs come in finishes, brushed brass, matte black, simple white, that blend seamlessly with a range of kitchen aesthetics rather than looking obviously adjustable or temporary. I’d suggest planning your track placement with some flexibility in mind from the start, positioning tracks slightly wider than your current shelf plans require, so you have room to add an additional shelf later without needing to install new tracks entirely.
Final Thoughts
Looking back at every kitchen shelving project I’ve worked on, the ones that ended up genuinely useful, not just nice to look at for the first few weeks, were always the ones planned around how the kitchen actually gets used day to day, not just how we wanted it to look in a single photo. Before choosing any of these ideas for your own kitchen, take a moment to think honestly about your daily habits: what do you reach for constantly, what would you actually want visible versus tucked away, and how much maintenance you’re realistically willing to keep up with.
Beautiful shelving that doesn’t match how you actually cook and store things will end up frustrating and cluttered within months, no matter how good it looked on installation day. Start with genuine function, then layer in the styling choices from this list that fit both your kitchen’s space and your own daily routine. That approach, in my experience, is what separates shelving you’ll love using every single day from something that only ever looked good in the photos taken right after it went up.